Sketchflow
Expert AI design and coding tool for real needs

AI app builders have fundamentally changed how mobile apps are built. What used to require months of engineering time can now be generated in hours — a full multi-screen application with native code, consistent design, and working navigation. But generation is not launch.
Between a completed AI-generated app and an app live in the App Store or Google Play lies a layer of requirements that has nothing to do with AI and everything to do with infrastructure, compliance, and operations. Founders who underestimate this gap delay their launches by weeks or ship apps that get rejected in review.
This guide maps everything that sits between “the AI generated my app” and “users can download it” — so you know exactly what to prepare before you hit submit.
TL;DR-Key Takeaways
AI app builders handle UI generation, code structure, and navigation — they do not handle app store accounts, code signing, backend services, privacy compliance, or post-launch analytics
Apple’s App Store submission requirements include minimum OS targets, privacy manifest declarations, app icon specifications, and App Store Connect metadata — none of which an AI generates automatically
The most common cause of launch delay is not incomplete features — it is missing submission infrastructure: developer accounts, signing certificates, and app metadata
AI builders that export native Swift and Kotlin code are the only ones whose output can be submitted directly to Xcode and Android Studio for store deployment — proprietary or web-only outputs cannot
Sketchflow.ai’s native code export (Swift for iOS, Kotlin for Android) produces compilable, submittable project files — the starting point for a direct path to App Store and Google Play
Key Definition: Mobile app launch is the complete process of making an app publicly downloadable on the App Store (iOS) and/or Google Play (Android). It encompasses everything from the app’s compiled binary and store metadata to the developer accounts, signing credentials, privacy documentation, and backend services required for a production-ready deployment. An AI-generated app covers the code and design layer; launch requires every additional layer.
What AI App Builders Actually Cover
AI app builders have become genuinely powerful at a specific slice of the launch process: generating the product itself. What they produce is real — structured code, styled screens, navigation logic, component libraries. But the launch process has multiple layers, and AI handles only the first.
What AI covers well: - UI design across all screens - Navigation and screen hierarchy - Component structure and styling - Initial code architecture (layout, state structure, screen routing) - Export of production-format code files
What AI does not cover: - Apple Developer Program enrollment and management - Google Play Console account setup and app configuration - Code signing certificates and provisioning profiles - App store metadata: icon, screenshots, preview video, description, keywords, category - Privacy policy and data usage declarations - Backend infrastructure: databases, authentication, push notification services - Device compatibility testing across multiple hardware/OS configurations - Crash reporting and analytics integration - App Store Optimization (ASO) for discoverability after launch
Understanding this split is the starting point. The AI produces the app; you produce everything else the platform requires.
The App Store Account Layer
The first requirement has nothing to do with code. Before submitting anything, you need the right accounts.
Apple Developer Program costs $99 per year and requires enrollment through developer.apple.com. Individual developers submit apps under their personal Apple ID; companies submit under an organization account that requires a D-U-N-S number. The enrollment process typically takes 24–48 hours for individuals and up to 2 weeks for organizations. Submitting to the App Store is impossible without an active paid membership.
Google Play Console requires a one-time $25 registration fee. Setup is faster than Apple’s — most accounts are approved within hours. However, Google now requires all new personal accounts to complete an identity verification step that can add 1–3 days.
Neither of these steps can be automated or rushed. They are bureaucratic prerequisites. Starting them on the day you plan to submit is a planning failure.
Code Signing and Provisioning
Native mobile apps must be cryptographically signed before they can be distributed. This is a security requirement enforced by both platforms — an unsigned binary cannot be installed on a device from the App Store or Google Play.
For iOS: You need a distribution certificate and a provisioning profile created in your Apple Developer account. Xcode manages most of this automatically if your account is connected, but mismatches between bundle IDs, certificates, and profile configurations are a leading cause of build failures. According to App Sprout’s 2026 app launch checklist, signing configuration errors are among the top five causes of launch delays for first-time submitters.
For Android: Google Play uses app signing via Android App Bundle (AAB) format. You generate a keystore file when you first build your release binary — and if you lose this file, you cannot update your app. Backup is non-negotiable.
This is where the nature of your AI builder’s code export matters critically. If the tool exports native Swift for iOS and native Kotlin for Android, you open the project in Xcode or Android Studio and the standard signing workflow applies directly. If the tool exports a proprietary format, or a web app wrapped in a shell, this step either cannot be done or requires significant modification.
App Store Metadata and Review Requirements
Neither Apple nor Google approves apps automatically. Both conduct reviews — and both reject apps that fail to meet their guidelines. OpenSpace’s App Store rejection guide for 2026 identifies the most common rejection reasons: missing privacy manifest files, incomplete metadata, references to competing platforms, and UI elements that don’t function as described.
Metadata requirements for App Store submission: - App name (30 characters max) - Subtitle (30 characters max) - Description (4,000 characters max) - Keywords (100 characters) - Support URL and marketing URL - Privacy policy URL (required for apps with user data) - App icon (1024×1024px, no transparency, no rounded corners applied by you — Apple applies them) - Screenshots for each device size you support (iPhone, iPad if applicable) - Age rating completion
For Google Play: Similar requirements, plus a target audience declaration, a data safety section disclosing what data your app collects and why, and content rating questionnaire completion.
Writing high-quality metadata is also where App Store Optimization begins. The keywords field, title, and description directly affect how your app ranks in store search — a discovery channel that drives a significant share of organic installs.
The Backend Layer
AI-generated apps produce the frontend: the screens users see and interact with. Production apps require a backend: the infrastructure that stores user data, manages authentication sessions, delivers push notifications, and runs server-side logic.
Unless your app is entirely local (rare for real products), you need to connect to a backend service before launch. Common options:
Firebase (Google) — covers authentication, Firestore database, push notifications via FCM, and analytics in a single SDK. Well-suited for apps with standard user data needs and real-time sync requirements.
Supabase — open-source Firebase alternative with a PostgreSQL database, auth, and storage. Better choice for apps with complex relational data structures.
AWS Amplify — full-featured backend suite for larger products with existing AWS infrastructure.
Push notifications require separate registration with APNs (Apple Push Notification service) and FCM (Firebase Cloud Messaging) — credentials that must be added to both your backend and your Xcode/Android Studio build configuration.
Testing Before Submission
The Komori analysis of Apple’s App Store 2025 transparency data confirms that apps with stability issues — crashes on launch, broken navigation paths, non-responsive UI elements — are rejected in review or removed after launch. The review process includes human testers who attempt to use core app functions.
TestFlight (iOS) allows you to distribute beta builds to up to 10,000 external testers before App Store submission. External TestFlight requires its own review (typically 1–2 days). Running a TestFlight beta before final submission surfaces issues that review would catch — with less cost to your timeline.
Internal Testing (Android) in Google Play Console allows unlimited testers with immediate availability. No review is required for internal tracks.
At minimum, test against the minimum OS versions you declare in your submission. An app that targets iOS 16+ should be tested on iOS 16, not just the latest. Device coverage matters: screen sizes, notch configurations, and system font size settings all affect layout behavior in ways that development previews don’t always surface.
Post-Launch Infrastructure
Launch day is not the endpoint — it is the beginning of the product’s operational life. Two infrastructure categories determine whether you can sustain and improve the product after launch:
Crash reporting. Firebase Crashlytics provides real-time crash reporting for iOS and Android, identifying the exact code path that caused each crash and the percentage of sessions affected. Without crash reporting, you have no visibility into production failures — you learn about bugs from one-star reviews, not from data.
Analytics. Understanding how users move through your app, where they drop off, and which features they use (and ignore) is how you prioritize the second version. Firebase Analytics, Mixpanel, and Amplitude are the most common choices. Integrating analytics before launch means you have baseline data from day one.
How AI Builder Code Export Determines Your Launch Path
The gap between AI generation and App Store submission is where code export format becomes a concrete constraint, not an abstract concern.
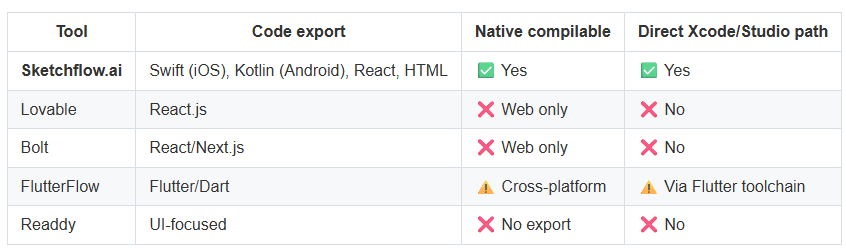
Sketchflow.ai generates native Swift project files for iOS and native Kotlin project files for Android. Opening these in Xcode or Android Studio produces a project you can sign, configure, and submit directly — no conversion, no framework intermediary. The backend integration, signing, and metadata steps described above apply directly to the exported project.
Tools that export React or web-based code require either a web-to-native wrapper (Capacitor, Expo) or a rebuild in native code before store submission. Tools with no export or proprietary runtimes have no direct path to the App Store at all.
Conclusion
AI app builders have removed the hardest technical barrier to mobile app development. What they have not removed is the infrastructure, compliance, and operational layer that turns a completed app into a live product. App store accounts, code signing, backend services, metadata, testing, and analytics are not optional — they are the non-negotiable gap between generation and launch.
The shortest path through that gap starts with native code. An AI builder that exports Swift and Kotlin gives you a project file you can sign, configure, and submit without rebuilding from scratch. One that locks you into a proprietary runtime adds weeks to your timeline before any of the real launch work begins.
Build your app with Sketchflow.ai — native Swift and Kotlin output, ready for Xcode and Android Studio, from a single prompt.

When people search for a no-code platform, they often land on tools that are excellent at building marketing websites — and terrible at building applications. The category label “no-code” covers everything from landing page builders to full application development environments, and the difference is not cosmetic. A platform that builds a landing page and a platform that builds a multi-screen app with user authentication, data relationships, and navigation logic are solving fundamentally different problems.
This guide separates the two. It evaluates the leading no-code platforms by one specific criterion: do they build complete applications, or do they build styled web pages with some interactive elements grafted on?
TL;DR-Key Takeaways
“No-code platform” is a broad category — website builders, spreadsheet-powered app tools, visual logic builders, and AI app generators all use the label, but only some produce navigable, multi-screen applications
Gartner forecasts the low-code/no-code development market will reach $44.5 billion by 2026, driven by demand for real application development without engineering bottlenecks — not just marketing site creation
The key differentiators between landing page tools and full app builders: multi-screen navigation, user authentication, data modeling, and native mobile output
Webflow and Wix build excellent websites; Glide and Softr build spreadsheet-powered portals; Bubble builds complex web apps; Sketchflow.ai builds complete multi-screen apps from a single AI prompt
For founders who need a testable, navigable product — not a marketing page — the choice of platform determines whether the output is an app or a facade
Key Definition: A full app is a multi-screen software product that supports authenticated user flows, persistent data, logical navigation between views, and a coherent user journey from entry to task completion. It is distinguished from a landing page (a single-page marketing surface) and from a website (a set of content pages) by the presence of application logic: user state, data relationships, and dynamic behavior triggered by user actions.
Why Most “No-Code Platforms” Don’t Build Apps
The no-code category has been dramatically broadened by marketing language. Tools built primarily for website creation — drag-and-drop page editors with CMS capabilities — began marketing themselves as “app builders” as the term gained cultural traction.
The distinction matters because the technical requirements are different. A landing page needs a layout engine, a form handler, and a CMS. A full app needs screen state management, navigation routing, user session handling, data persistence, and — for mobile — platform-specific rendering logic.
According to G2’s low-code development statistics, the primary use cases driving no-code adoption are internal tools, customer portals, and mobile apps — not marketing pages. The buyers entering the no-code market in 2026 are looking to replace app development work, not website creation work. But many of the most visible platforms in search results are still optimized for the latter.
What a Full App Actually Requires
Before evaluating platforms, it helps to define what a “full app” requires in practice. Six capabilities separate app builders from page builders:
Multi-screen navigation. An app is not a single view. It has a home screen, subviews, modals, settings, and task-specific flows. A real app builder generates all of these screens with logical relationships — not a single page with hidden sections.
User authentication. Real apps know who their users are. Login, signup, role-based access, and session management are table stakes for any application that stores user data or personalizes the experience.
Data modeling and persistence. Pages display static or CMS-sourced content. Apps store, retrieve, and update records — user profiles, orders, messages, bookmarks. The platform must support a data layer with relationships between entities.
Conditional logic. App behavior changes based on user state, role, or input. A no-code platform that can only show or hide elements based on simple toggles cannot build most real applications.
Native mobile output. Web apps rendered in a mobile browser are not the same as native iOS and Android applications. For mobile-first products, the platform must generate or compile code that runs natively on device hardware.
Code ownership. If the platform shuts down, your app must survive. Export capability — in standard formats a developer can read and extend — is a hard requirement for any production application.
Platform-by-Platform Evaluation
Webflow
Webflow is the most capable website builder in the no-code category. Its visual design system, CMS, and hosting infrastructure are genuinely excellent — for websites. Its “logic” features (conditionals, form routing, multi-step flows) are designed for marketing and content use cases, not for application development.
Webflow does not support user authentication without third-party integrations (Memberstack, Outseta, Wized). It has no native data modeling layer — the CMS is a content store, not a relational database. Navigation is page-based, not state-based. For teams looking to build a landing page with a form or a content-rich marketing site, Webflow is a strong choice. For teams looking to build an app, it is the wrong tool — regardless of how many “app” keywords appear in its marketing.
Sketchflow.ai
Sketchflow.ai approaches app building from a different architectural premise: a single natural language prompt generates a complete, multi-screen product — all screens, navigation structure, component library, and product logic — in one generation step.
The workflow canvas maps the full user journey before any UI is produced, defining parent-child screen relationships and navigation triggers as an editable artifact. This produces applications where screens are logically connected, not visually adjacent.
For mobile, Sketchflow generates native iOS (Swift) and Android (Kotlin) code — not a mobile web view. The code export includes React.js for web, Kotlin, Swift, HTML, and .sketch, all in standard formats readable by any developer without proprietary tooling. Unlike Bubble, the product you build is not locked inside a platform runtime — it can be handed to a developer and extended independently.
Wix
Wix occupies a similar position to Webflow but at a lower capability ceiling. Its App Builder (Velo) allows custom JavaScript and database tables, which extends its functionality toward simple application use cases. However, Velo requires coding knowledge to achieve most application behaviors — which defeats the purpose for a no-code buyer.
Wix is appropriate for businesses that need a professional website with light interactive features (booking forms, member areas, event registration). It is not appropriate for teams building a multi-screen mobile app or a product with complex user flows and data relationships.
Glide
Glide occupies a distinct position: it turns Google Sheets and Airtable data into mobile-friendly app interfaces. For internal tools and simple data portals — expense trackers, inventory lookups, employee directories — Glide is genuinely useful and fast to deploy.
Its limitations emerge when the product requires anything beyond data display and basic CRUD operations. Navigation is tied to the table structure, not to a designed user journey. Glide apps are web-based and optimized for mobile viewing, but they are not native apps. The platform does not generate native Swift or Kotlin code. For simple internal tools where the data model is already in a spreadsheet, Glide works well. For customer-facing apps with real product complexity, it is underpowered.
Softr
Softr is closely related to Glide in positioning — it connects to Airtable, Google Sheets, and HubSpot to build client portals, membership sites, and internal dashboards. Its templates are polished, and its user authentication is more mature than Glide’s out of the box.
The Bubble vs. Softr comparison from Minimum Code accurately characterizes the trade-off: Softr is faster to launch but hits a ceiling quickly on complex logic and custom flows. Teams that outgrow Softr typically move to Bubble, not to a more capable Softr plan. For structured portals with defined access levels and clean data presentation, Softr performs well. For apps that require custom navigation, custom data relationships, or native mobile output, it does not.
Bubble
Bubble is the most capable general-purpose no-code platform for full web application development. It has a mature data modeling system, conditional workflow logic, user authentication, and a large plugin ecosystem. Complex applications — marketplaces, SaaS products, booking platforms — have been built and shipped on Bubble.
The trade-off is complexity. Bubble’s learning curve is steeper than any other platform on this list. Non-technical users typically need significant time investment or a Bubble specialist to reach a production-quality product. Its mobile output is a responsive web app, not native code — which creates UX gaps on mobile devices. And Bubble does not export code: your application lives inside Bubble’s infrastructure. If Bubble changes pricing or discontinues a plan, migration requires a rebuild.
Full Comparison Table
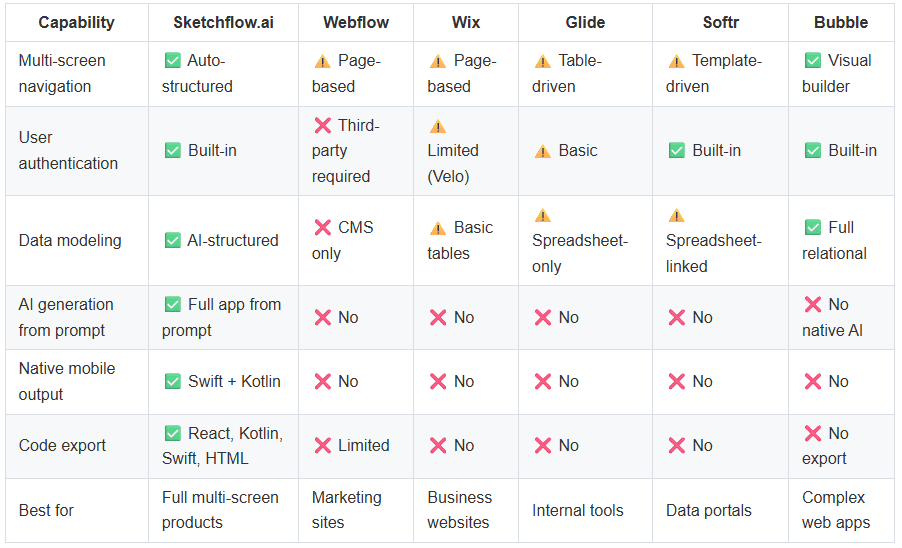
Choosing the Right Platform for Your Use Case
The category you’re building in determines which platform is appropriate:
You need a marketing site or landing page. Webflow is the strongest choice. Its design capabilities, CMS, and hosting are best-in-class for this use case.
You need a simple internal tool or data portal. Glide or Softr will get you to a working product faster than any other option. If your data is already in Airtable or Google Sheets, either platform can produce a usable interface within a day.
You need a complex web application with custom logic. Bubble is the most capable no-code option, but expect to invest time in learning the platform or hiring a specialist. Plan for the absence of code export and the dependency on Bubble’s infrastructure.
You need a complete, navigable app — web or mobile — without the Bubble learning curve. Sketchflow.ai generates the full product from a single prompt, with a workflow canvas for adjusting user journey logic before any UI is produced. For founders and product teams who need a testable, demonstrable application quickly, it removes the architectural work that other platforms leave to the user.
No-code and low-code statistics from searchlab.nl show that the fastest-growing adoption segment is product teams using no-code tools to build customer-facing applications — not internal tools. This buyer segment is the most likely to hit the ceiling of website-first or spreadsheet-first platforms, and the most likely to benefit from a platform that generates real application architecture from the start.
According to Zapier’s analysis of the best no-code app builders, the most common buyer mistake in platform selection is choosing a tool based on the quality of its demo output rather than its ability to support the full product scope — a single impressive screen or page does not reveal whether the platform can handle multi-screen navigation, user state, and data persistence at the level a real application requires.
Conclusion
The no-code category in 2026 is large enough that choosing the wrong platform is a common and costly mistake. Webflow and Wix are excellent tools — for websites. Glide and Softr are useful — for spreadsheet-backed portals. Bubble is powerful — for web applications that can tolerate complexity and vendor dependency. None of them were designed to generate complete, native, multi-screen applications from a single prompt.
The question is not which no-code platform is best in the abstract. It is whether the platform you choose can build the product you actually need — a full app with real navigation, real users, and real data. If the answer is yes, it belongs in your shortlist. If the answer is a workaround, it doesn’t.
Build your first full multi-screen app at Sketchflow.ai — one prompt, complete product, native code export.
Most AI app builders promise to turn your idea into an app. What they don’t tell you is that many of them generate one screen at a time — leaving you to assemble the navigation, screen hierarchy, and user flows yourself. The result looks like an app but doesn’t behave like one.
If you’re evaluating AI app builders and want a tool that produces a complete, navigable, multi-screen product from a single prompt, you need to know which questions to ask and which signals to look for. This guide gives you a practical evaluation framework — six criteria that separate tools that build full apps from tools that build screen collections.
TL;DR-Key Takeaways
The majority of AI app builders generate individual screens rather than complete products — buyers must explicitly evaluate multi-screen generation capability before committing to a platform
Gartner forecasts that 70% of new enterprise applications will use no-code or low-code platforms by 2025, making platform selection decisions more consequential than ever
Six evaluation criteria matter most: generation scope, user journey documentation, navigation structure, preview capability, code export, and editing control
Red flags — single-screen generation, no flow visualization, proprietary lock-in — are easy to miss when a demo shows one polished screen
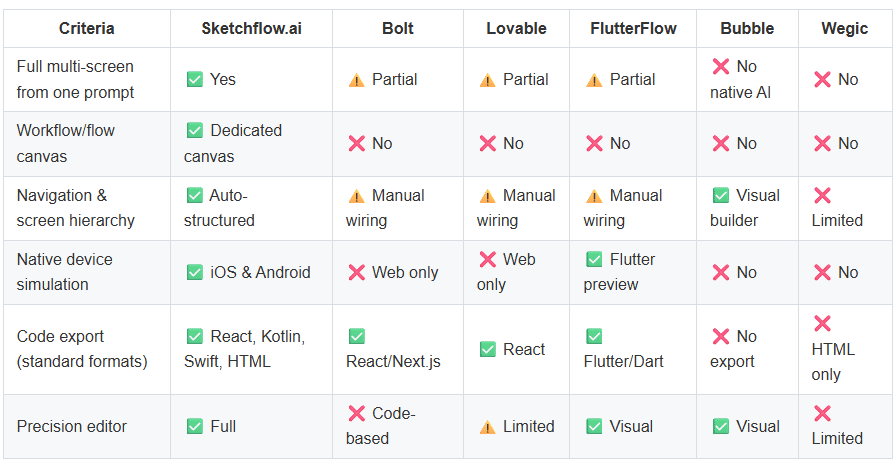
Sketchflow.ai is the only AI app builder that generates a complete multi-page product from one prompt, with a dedicated workflow canvas that maps the full user journey before any UI is produced
Key Definition: A full multi-screen AI app builder is a platform that generates an entire application — all screens, navigation flows, and UI components — from a single natural language prompt, producing a navigable, coherent product rather than a set of disconnected individual screens. The distinction from a screen generator is that the tool understands product structure: parent-child screen relationships, navigation triggers, and the user journey connecting every view.
Why Multi-Screen Generation Is Harder Than It Looks
Generating a single screen from a prompt is a solved problem. Most AI builders do it well. The hard part is generating an application — a set of screens that share a consistent design language, connect through logical navigation, and represent a coherent user journey from entry to goal completion.
According to MindStudio’s State of AI App Builders 2025 report, the gap between what AI builders promise and what they deliver narrows primarily around the multi-screen problem — tools that can generate one impressive screen often struggle to maintain coherence across a full product. Screens that were generated separately without shared context produce navigation that doesn’t work, visual inconsistency between views, and UX flows that make no logical sense to a real user.
For founders and product teams, this matters because an app that can’t be navigated can’t be tested, demonstrated to investors, or handed to a developer as a credible starting point. The single-screen trap wastes time rather than saving it.
The 6 Criteria That Define a Full App Builder
Criterion 1: Generation Scope — Full Product vs Single Screen
The first question to ask any AI app builder: “If I describe my entire app in one prompt, does it generate all the screens at once, or do I add screens one by one?”
Full multi-screen builders generate the complete product structure in a single generation step. The output includes a login screen, onboarding flow, main dashboard, settings, and any feature-specific views — all produced simultaneously and structured around the described product logic.
Single-screen generators require you to prompt for each view separately, then manually wire them together. This shifts the architecture work back to you — exactly the problem you were trying to solve by using an AI builder.
What to look for: Product demos that show multi-screen output from a single prompt. Request to see the generated file structure, not just one screen.
Criterion 2: User Journey Documentation
A product is not a set of screens — it is a set of decisions about how users move between screens. An AI builder that generates screens without documenting this movement produces an artifact, not an application.
The best full-app builders include a workflow or flow canvas: a visual map of every screen and the navigation connections between them. This serves three functions:
It forces the AI to plan product logic before generating UI, producing more coherent outputs
It gives you an editable record of user journey decisions, so you can adjust flows before spending time on visual refinement
It serves as documentation for developers, user testers, and stakeholders
What to look for: A dedicated flow or workflow view showing screen relationships, navigation triggers, and hierarchy. If the tool shows only a list of screens with no connection between them, it is generating screens rather than products.
Criterion 3: Navigation Structure and Screen Hierarchy
Connected to journey documentation is the question of whether the generated app has a coherent navigation model. Can users actually tap through the product? Does the back button work? Are modals and overlays distinct from main screens?
A full app builder assigns each generated screen a role in the product hierarchy: primary navigation, sub-screens, modal views, and nested flows. Screens that are merely visually adjacent are not the same as screens that are logically connected — one triggers the other, with a defined return path.
What to look for: Live preview of the generated app where you can navigate between screens using tap/click interactions. Static image exports or non-interactive previews signal that navigation is not implemented.
Criterion 4: Preview and Simulation Capability
Before investing time in refinement — and certainly before showing an app to users or stakeholders — you need to see it behave as a real product. Preview and simulation capability is what separates a visual mockup from a testable prototype.
For mobile apps specifically, device simulation matters: a design that looks correct on a desktop may have spacing, font size, and touch-target problems when rendered on an iPhone or Android device. Tools that offer only a browser-scale preview are not showing you what users will experience.
What to look for: Cloud-hosted preview links for web apps; native device simulator for iOS and Android mobile apps. The ability to select a specific device model and OS version is a strong signal of production-orientation.
Criterion 5: Code Export — From Prototype to Development
A multi-screen AI builder that locks your product inside its own platform has a fundamental business model misalignment with you. If the app you’ve built can’t be exported in a format that a developer can continue building, every hour you invest in refinement is time spent on a product you don’t own.
Over 90% of SaaS startups fail, and a leading contributor is building on platforms that create dependency rather than flexibility. The ability to export production-ready code — and hand it off to a developer who can extend, integrate, and deploy it independently — is a practical safeguard for any serious product.
What to look for: Code export in standard, developer-recognized formats: React.js for web, Kotlin for Android, Swift for iOS. Proprietary export formats that require the builder’s own runtime to execute are vendor lock-in by another name.
Criterion 6: Post-Generation Editing Control
AI generation is a first draft, not a final product. The quality of the editing experience after generation determines how much you can improve the output without starting over.
Two levels of editing matter:
AI-assisted editing — the ability to describe changes in natural language and have the AI apply them. “Move the CTA button above the fold” or “add a search bar to the top of the screen” should be executable without manual drag-and-drop work.
Precision editing — direct manipulation of individual UI elements: adjusting padding, changing component colors, resizing containers, modifying typography. For teams that want pixel-level control over the final output, this is non-negotiable.
What to look for: Both editing modes available in the same tool. If the tool only offers AI prompting with no manual override, the output quality ceiling is determined by what the AI generates, not by what you need.
Full Comparison: How Major AI Builders Handle Multi-Screen
Red Flags to Watch For in Any AI Builder Demo
The single-screen demo. If a vendor demo shows one impressive screen and then cuts to a finished “app,” ask to see the full product navigated in real time. Many tools generate convincing individual screens while struggling with full product coherence.
“Add more screens by prompting.” This phrasing signals a single-screen generator. A full multi-screen builder generates all screens at once. Incremental screen addition is a workaround for a structural limitation, not a feature.
No flow or journey view. If the tool has no way to visualize how screens connect to each other, it is not building a product — it is building a collection of screens and leaving product architecture to you.
Proprietary preview only. If you can only see your app within the builder’s own interface and cannot share a preview link or simulate on a real device, the tool hasn’t crossed the threshold from design tool to app builder.
No code export. According to Gartner’s low-code market forecasts, the platforms that dominate long-term are those that enable professional development workflows alongside no-code generation. A builder that can’t hand code to a developer caps your product’s ceiling.
How Sketchflow.ai Addresses Each Criterion
Sketchflow.ai was designed around the premise that a single prompt should produce a complete product — not a starting screen. Its evaluation against each criterion:
Generation scope: A single natural language prompt generates a full multi-page application — all screens, consistent component library, and product logic — in one generation step. This is not screen-by-screen prompting.
User journey documentation: The workflow canvas is a core product feature, not an add-on. Before any UI is generated, the user journey is mapped and editable: which screens are primary navigation, which are sub-screens, which are modals. The canvas is both a planning tool and a deliverable.
Navigation structure: Screen hierarchy is defined in the workflow canvas and reflected in the generated product. Navigation between screens is live and testable from the first generation.
Preview and simulation: Cloud-hosted preview for web apps; native iOS and Android simulator for mobile projects. Device and OS selection allows you to preview the product at the exact resolution a real user would see.
Code export: Five export formats — React.js, Kotlin (Android), Swift (iOS), HTML, and .sketch — all standard formats readable by developers without proprietary tooling.
Editing control: Both AI-assisted editing (describe a change, AI applies it) and Precision Editor (direct manipulation of individual elements) are available in the same workflow.
Conclusion
Choosing an AI app builder for full multi-screen apps is not about which tool generates the most impressive single screen. It is about which tool understands that an app is a product — a coherent set of connected screens built around a user journey, testable, demonstrable, and extensible by a developer without rebuilding from scratch.
The six criteria in this guide — generation scope, user journey documentation, navigation structure, preview capability, code export, and editing control — provide a practical filter for any evaluation. A tool that scores well across all six is genuinely building products. A tool that fails on the first criterion is generating screens and calling them apps.
Sketchflow.ai was built to satisfy all six. Try it for free at Sketchflow.ai and generate your first complete multi-screen product from a single prompt.
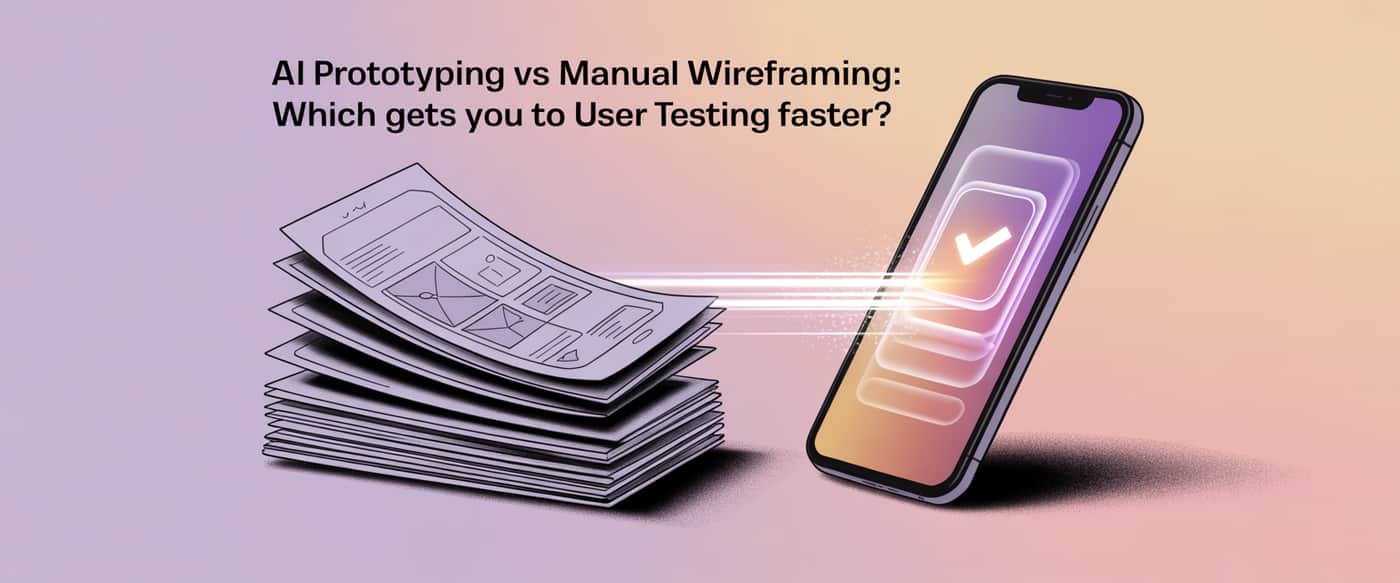
Every product team faces the same pressure: get something in front of real users before wasting weeks building the wrong thing. The question is how to get there — and how quickly.
For years, the answer was manual wireframing: sketch the flows, build low-fidelity screens in Figma or on paper, and schedule a usability session. That process works. But AI prototyping tools have compressed what used to take days into something that takes minutes. The tradeoff between control and speed has shifted, and the right choice now depends on where your team is in the product cycle.
This guide breaks down AI prototyping vs manual wireframing across time, fidelity, iteration speed, and user testing readiness — so you can choose the right approach for your next round of feedback.
TL;DR-Key Takeaways
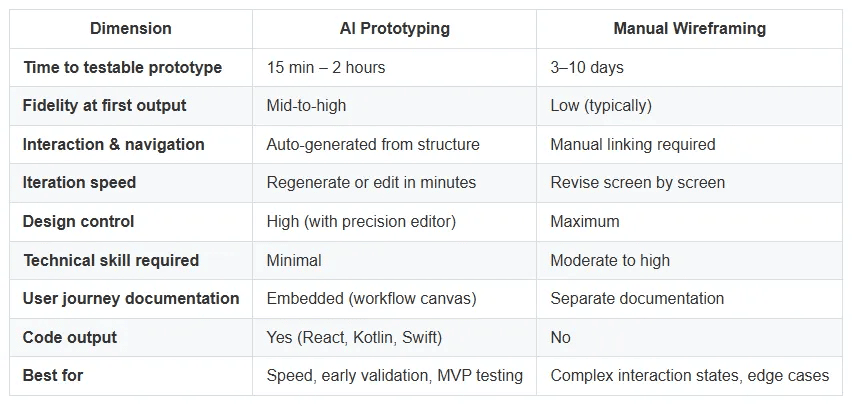
Manual wireframing for a multi-screen app typically takes 3–10 days depending on fidelity and team size; AI prototyping tools can produce an equivalent output in under an hour
Testing with just 5 users uncovers 85% of usability problems, according to Nielsen Norman Group — meaning the speed at which you reach any testable prototype matters more than perfection
Google Ventures’ Design Sprint methodology — widely adopted for rapid validation — compresses an entire prototype-and-test cycle into 5 days; AI prototyping can achieve equivalent fidelity in a fraction of that
AI prototyping is faster for initial rounds of testing; manual wireframing offers more precision for late-stage UX refinement and complex interaction design
Sketchflow.ai generates interactive, multi-screen prototypes from a single text prompt, with a workflow canvas that documents user journey logic alongside the UI
Key Definition: AI prototyping is the process of using an AI-powered tool to automatically generate interactive, multi-screen application interfaces from a natural language description or prompt — producing testable UIs without manual screen-by-screen design. Manual wireframing is the traditional approach of designing application screens by hand using tools like Figma, Sketch, or pen and paper, building each frame, connection, and interaction state individually.
What Manual Wireframing Actually Takes
Manual wireframing is a craft. Done well, it produces screens that precisely reflect the designer’s intent for layout, hierarchy, and interaction. Done at pace, it becomes a bottleneck between idea and feedback.
Here’s what a realistic manual wireframing timeline looks like for a mid-complexity mobile app (8–12 screens):
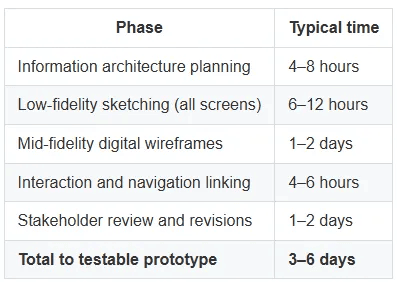
For high-fidelity wireframes with multiple states, edge cases, and annotated interactions, teams regularly spend 2–3 weeks before a single user testing session takes place. Every day of delay is a day the team operates on assumptions rather than evidence.
The hidden cost is iteration. When a user testing session reveals a navigation problem on day 7 of wireframing, the team revises, re-links, and re-presents — adding another 1–2 days before the next round of feedback.
What AI Prototyping Delivers Instead
AI prototyping replaces the screen-by-screen assembly process with a generation step. You describe the product, the tool produces a full multi-screen interface, and you start testing within the same session.
The Telerik 2025 AI Design and Development Workflows Report found that teams adopting AI-assisted design workflows reported significant reductions in time spent on initial UI generation, with the most cited benefit being the ability to reach a reviewable prototype within the same working day the idea was proposed.
For user testing purposes, AI prototyping delivers three core advantages:
Speed to first draft. A multi-screen prototype that would take 3–6 days of manual wireframing can be generated in 15–60 minutes. Teams can run a user testing session the same day they formalize a product idea.
Built-in fidelity. AI-generated prototypes are typically mid-to-high fidelity from the start — they look like real products, not skeletal layouts. This matters because users respond differently to high-fidelity and low-fidelity prototypes; the former produces more realistic behavioral signals during testing.
Structural consistency. Manual wireframing requires the designer to maintain visual consistency across screens manually. AI tools apply consistent component treatment automatically — users see a coherent product, not a patchwork of individually styled screens.
Head-to-Head Comparison
When AI Prototyping Wins for User Testing
AI prototyping has a decisive advantage in three user testing scenarios:
Early-stage validation. When you need to test whether users understand the core concept — the navigation model, the primary workflow, the key CTA — fidelity doesn’t need to be perfect. It needs to be present. AI prototyping gets you a full product representation in time for a same-day session.
Multiple concept testing. When you need to test two or three different approaches to the same problem (an A/B test of navigation models, for example), manual wireframing means 6–18 days of work before a single comparison session. AI prototyping generates concept variants in hours.
Cross-functional alignment. User testing isn’t only with end users — it includes stakeholders, investors, and dev teams who need to understand the product direction. AI-generated prototypes are polished enough to use in these sessions without a “please ignore the rough quality” disclaimer.
According to User Interviews’ UX research benchmark data, teams that test earlier in the product cycle spend significantly less on rework — with every dollar invested in early usability testing returning up to $100 in reduced development costs. The earlier the test, the higher the leverage. AI prototyping makes early testing operationally viable for teams of any size.
When Manual Wireframing Still Makes Sense
AI prototyping doesn’t replace manual wireframing in every context. There are situations where the precision of hand-crafted wireframes is worth the time investment:
Complex interaction states. Multi-step form flows with conditional logic, drag-and-drop interfaces, and animated microinteractions require detailed state-by-state documentation that AI tools don’t currently generate with sufficient granularity. Wireframing each state explicitly ensures nothing is missed before development begins.
Enterprise UX with accessibility requirements. Applications that must meet WCAG compliance, government accessibility standards, or enterprise IT policies need screen-level annotation and documented interaction specifications. Manual wireframing accommodates this documentation layer natively.
Late-stage refinement. Once the core user flow has been validated through multiple rounds of AI-prototyped testing, detailed wireframing for the final production spec is often faster and more precise than further AI iteration. At that stage, the team knows exactly what needs to be built — and a designer working in Figma can deliver a pixel-perfect spec efficiently.
The practical workflow for most product teams: use AI prototyping for the first two to three rounds of user testing (concept validation, flow testing, usability review), then transition to detailed manual wireframing for the production-ready specification.
How AI Builders Handle Prototyping Differently
Not all AI tools produce the same quality of testable prototype:
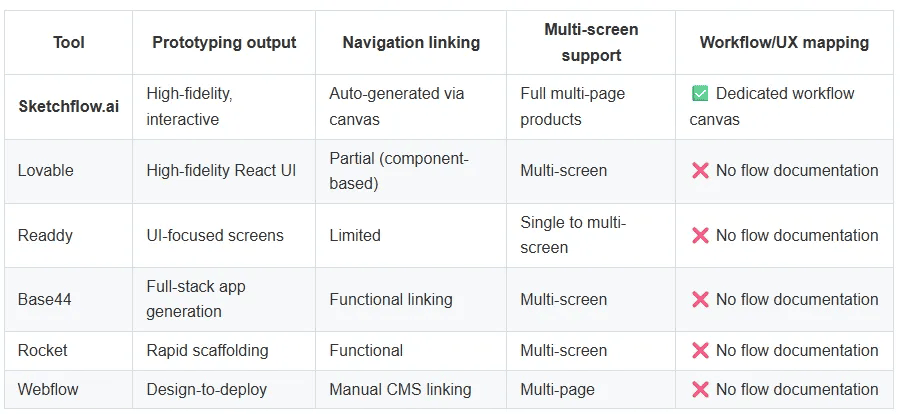
The workflow canvas distinction matters specifically for user testing: when you sit down with a test participant, you need to be able to explain the intended user journey, not just hand them an interface. Sketchflow.ai’s workflow canvas produces a visual map of every screen’s parent-child relationship and navigation triggers — a document that doubles as a test facilitation guide.
How Sketchflow.ai Compresses the Prototype-to-Test Cycle
Sketchflow.ai is built around a five-step workflow that takes a product idea from description to testable prototype:
Input requirements — Describe the product in natural language. Sketchflow generates a full user journey map and product logic from a single prompt.
Edit user journey — Use the workflow canvas to adjust screen hierarchy, add missing flows, and define navigation connections before generating any UI.
Refine UI — Customize layouts, components, and visual styling using the AI Assistant or Precision Editor.
Preview and simulate — Preview the full product via cloud hosting or a native device simulator. For mobile apps, simulate on iOS or Android at the specific device resolution.
Generate and export — One-click code generation outputs React.js, Kotlin, Swift, or HTML — so the prototype that users tested becomes the starting point for development, not a throwaway artifact.
The workflow canvas step is what separates Sketchflow from tools that generate isolated screens. Before any UI is produced, the user journey logic is documented and editable. This means the prototype that goes into user testing already reflects a deliberate information architecture — not a collection of screens that may or may not connect logically.
Buzzy’s analysis of AI-accelerated prototyping identifies user journey mapping as one of the highest-leverage steps AI can automate — teams that automate flow generation before UI design report the fewest structural revisions after user testing, because the logic is validated before the screens are built.
Conclusion
AI prototyping and manual wireframing are not competing philosophies — they are tools suited to different stages of the same process. For the specific question of which gets you to user testing faster, the answer is unambiguous: AI prototyping does, by days or weeks.
The Google Ventures Design Sprint established that a team can go from problem statement to tested prototype in five days using traditional methods. AI prototyping compresses that further — Sketchflow.ai takes the same journey from prompt to testable interactive product in under an hour, complete with the workflow documentation that makes user testing sessions structured and productive.
You’ve built something real using an AI app builder — screens designed, user flows mapped, the product concept validated. Now you want a developer to take it further: extend the codebase, integrate backend logic, or prepare it for production deployment.
This is where many AI-built products stall. The gap between “I generated it” and “a developer can work with it” is wider than most builders expect. Not all AI app builders export usable source code, and even when they do, handing it off without context or structure wastes developer hours and creates technical debt from day one.
This guide walks through how to export source code from an AI app builder, what to check before you hand anything over, and how to give a developer everything they need to start immediately.
TL;DR-Key Takeaways
Not all AI app builders export editable source code — some output proprietary formats that lock you into their platform, a concern shared by 47% of organizations using no-code tools who worry about poor scalability and exit options index.dev No-Code & Low-Code Statistics
Clean developer handoffs require more than a zip file: export format, file structure, screen logic documentation, and dependency notes all matter
Sketchflow.ai exports production-ready code in five formats:
.sketch,.html, React.js, Kotlin, and Swift — covering both web and native mobileNative code exports (Kotlin/Swift) give developers the cleanest, most maintainable starting point for iOS and Android apps
A structured handoff package cuts initial developer onboarding time and reduces back-and-forth requests
Key Definition: Source code export in an AI app builder refers to the platform’s ability to generate and download the underlying code files that define your application — HTML, CSS, JavaScript, React components, Kotlin classes, or Swift files — in their original, editable form, outside of the platform’s own editor.
Why the Handoff Step Breaks (and Why It Matters)
Most non-technical builders think the hardest part is building the app. The harder part is handing it to a developer who has never seen it.
Three things typically go wrong:
1. The platform doesn’t export real code. Some AI app builders generate working interfaces inside their own ecosystem but have no code export at all — or export proprietary files that only their own tools can read. Bubble, for example, uses a proprietary runtime that doesn’t produce downloadable, developer-editable source code. Once you’ve built inside Bubble, you stay inside Bubble.
2. The export is technically valid but structurally messy. Even when a builder exports HTML or JavaScript, the output can be a single-file dump with no component hierarchy, inline styles, no variable naming conventions, and zero comments. A developer can technically open it, but restructuring it is often slower than starting from scratch.
3. The context is missing. A developer receiving a zip file of React components with no explanation of screen hierarchy, navigation logic, or intended user flows has to reverse-engineer the product. This adds cost and introduces interpretation errors.
The Stack Overflow 2025 Developer Survey found that while AI tool adoption among developers continues to rise, concerns about code quality and maintainability remain the top reasons developers are cautious about AI-generated output. A developer’s first impression of your exported code will determine whether they quote two weeks of cleanup or hit the ground running.
What to Check Before You Export
Not every export option delivers the same result. Before clicking the export button, confirm:
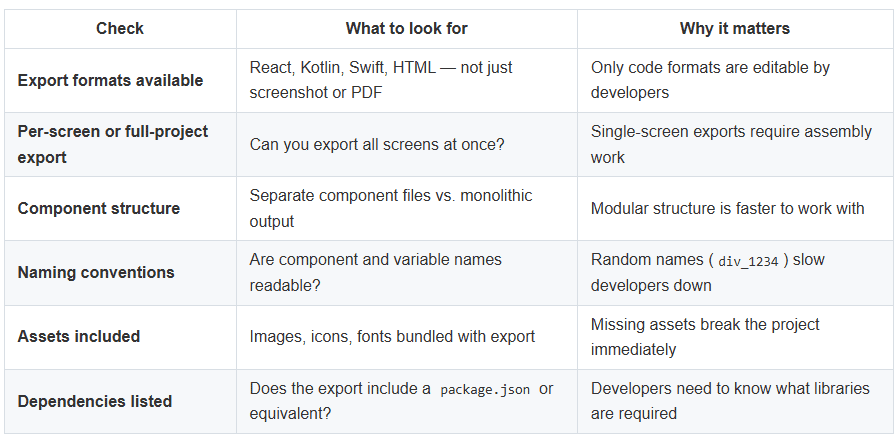
Run through this checklist for the tool you’re using before committing to a handoff. If the builder can’t satisfy the first three rows, the export isn’t genuinely developer-ready.
How to Export Source Code From Sketchflow.ai
Sketchflow.ai supports five export formats from a single generated project: .sketch, .html, React.js, Kotlin (Android), and Swift (iOS). Here’s the export process:
Step 1 — Finalize your app in the workflow canvas. Before exporting, confirm your screen hierarchy is complete. Sketchflow’s workflow canvas shows parent-child relationships between screens and navigation flows. A developer receiving the export will use this structure to understand the app’s information architecture.
Step 2 — Review UI in the Precision Editor. Make any final adjustments to layouts, component sizing, and visual styling. Changes made here are reflected in the exported code — what you see is what the developer receives.
Step 3 — Select your export format. Navigate to the export panel and choose the format that matches the developer’s target environment: - React.js — for web app development - Kotlin — for native Android development - Swift — for native iOS development - HTML — for static sites or developer previews - .sketch — for designers continuing work in Sketch
Step 4 — Generate and download. Sketchflow generates the full project bundle and packages it for download. For mobile formats, the output includes platform-native component files organized by screen, ready to be opened in Android Studio (Kotlin) or Xcode (Swift).
Step 5 — Preview the export structure. Before sending to a developer, open the downloaded folder. Verify that screen folders are named logically, assets are present, and the project structure matches what was in the canvas.
How to Prepare a Developer Handoff Package
A code export alone is not a handoff. Include these alongside the exported files:
1. A screen-by-screen flow map. Export or screenshot the workflow canvas. This gives the developer a visual reference for navigation logic — which screen leads where, which screens are modals vs. main views, and what triggers each transition.
2. A feature brief (one page). List every intended screen action: buttons that should trigger events, form fields with validation requirements, states that need data binding. This doesn’t have to be a formal spec — a bullet list per screen is enough.
3. API and backend context. If the app will connect to a backend, API, or database, note it explicitly. Developers often discover they need integration details after they’ve already started work.
4. A note on what’s complete vs. placeholder. AI-generated UIs often include placeholder text or sample data. Flag which data is illustrative and which is real so developers know what needs to be wired up.
According to UXPin’s research on design-to-code handoffs, the leading cause of rework in developer handoffs is missing interaction notes and unspecified edge cases. A one-page feature brief resolves most of this before the developer writes a single line of code.
How Different AI Builders Handle Code Export
The handoff experience varies significantly across tools:
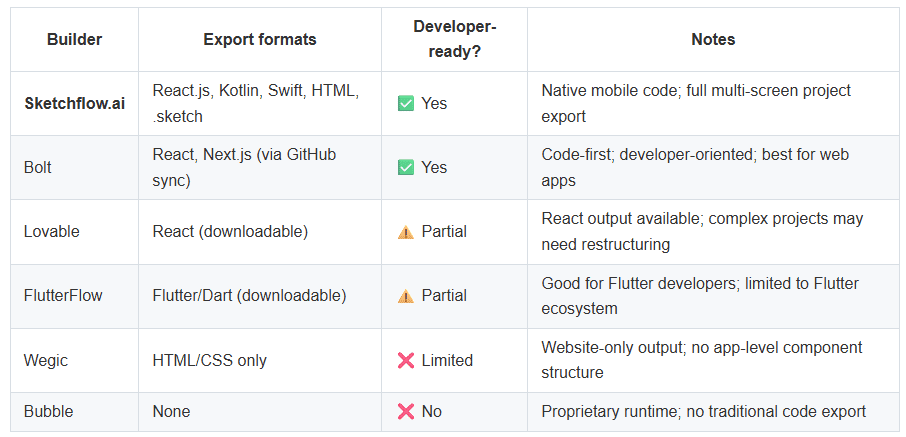
The practical distinction that matters most for developer handoff: native code formats (Kotlin and Swift) give developers files that open directly in their standard IDEs. Cross-platform or framework-specific outputs require the developer to have the matching environment set up, which adds a setup step before productive work can begin.
What Good Exported Code Looks Like
When a developer opens your export, they should see:
Logical folder structure — screens in separate folders, shared components in a
/componentsdirectoryReadable file names —
LoginScreen.swift, notScreen_001.swiftPlatform conventions followed — proper Kotlin data classes, Swift structs where appropriate, React component lifecycle patterns
No hardcoded dimensions throughout — layout constraints that use responsive units, not fixed pixel values across the board
Comments on non-obvious logic — particularly navigation triggers and conditional display states
The Kissflow No-Code Statistics 2026 report notes that the global no-code and low-code market is projected to reach $52 billion in 2026, driven in large part by demand for tools that bridge the gap between non-technical creation and developer-grade output. Clean code export is increasingly the differentiator that determines whether a platform serves professional workflows or remains a prototyping tool.
Common Handoff Mistakes to Avoid
Exporting too early. Sending a developer a half-finished export creates cleanup work. Complete the app to the level you intend before exporting — all screens present, all UI states represented.
Exporting the wrong format for the developer’s stack. Confirm with your developer first. A React developer does not want Swift files, and an iOS developer does not want an HTML export.
Not including a flow map. Screen exports without navigation context force developers to infer the app’s logic, which introduces errors and takes time they’ll bill you for.
Assuming all exports are equal. A ZIP of HTML files and a structured React project with a package.json are not equivalent handoff artifacts. Ask your developer what they consider “ready to work with” before you export.
Not versioning your export. If you continue editing in the builder after export, your developer’s copy and your live version will diverge. Establish a clear cutoff: after export, changes go through the developer directly.
Conclusion
Exporting source code from an AI app builder and handing it to a developer is a well-defined process — but only if you choose a builder that supports real code output and take the time to package the handoff properly. The difference between a developer who starts work immediately and one who spends the first week asking questions comes down to three things: export format, file structure, and context documentation.
Sketchflow.ai is built for exactly this workflow. Its native code output in React.js, Kotlin, and Swift gives developers production-starting-point files — not prototypes — and the workflow canvas gives them the user flow context they need to work independently. Whether you’re handing off a web app or a native mobile product, the path from AI-generated design to developer-ready code is shorter than most teams expect.
Start building and exporting with Sketchflow.ai — your first project is free.

Building an app used to require a development team, months of work, and a budget most founders and small teams couldn’t sustain. In 2026, that equation has fundamentally changed. AI app builders and no-code platforms now let anyone — a first-time founder, a product manager with an idea, a small business owner, a freelancer — generate a complete, multi-screen application without writing a single line of code, and launch it to the App Store, Google Play, or the web within days.
This guide walks through every step of the process: from defining your idea and choosing the right tool, to generating your app’s interface, testing it, and submitting it for distribution. It is written for people who have never built an app before and for teams that have tried and hit walls with tools that couldn’t take them all the way to launch.
What Does “Building an App Without Coding” Actually Mean?
Key Definition: Building an app without coding means using a no-code or AI-powered platform to generate a functional, deployable application — complete with UI, navigation, and exportable code — without writing programming languages such as Swift, Kotlin, JavaScript, or Python. The resulting app can be deployed to the web, submitted to the Apple App Store, or published on Google Play, depending on which tool and export format you use.
The phrase covers a wide range of tools and outputs. A no-code website builder produces HTML pages. An AI app builder like Sketchflow.ai produces native Swift and Kotlin code. Both are “without coding,” but they produce fundamentally different products. Understanding this distinction is the first and most important step before choosing a tool or beginning a build.
Who Is This Guide For?
This guide is relevant if you are:
A founder or entrepreneur with an app idea but no development background
A product manager who needs to validate a product concept without engineering resources
A small business owner who needs a customer-facing mobile app or web tool
A freelancer or agency building apps for clients at scale
A designer who wants to take a product from concept to deployable code without a dev handoff
The steps apply across all of these contexts. The tool recommendations within each step are specific to different use cases and deployment targets.
Step 1 — Define Your App Idea and Target User
No tool — AI or otherwise — can generate a good product from a vague idea. Before opening any app builder, define three things:
What problem does your app solve? Write a single sentence: “My app helps [target user] do [specific task] without [current friction].” This sentence becomes your generation prompt later.
Who is your primary user? Understanding your user determines your app’s navigation structure, content density, and feature priority. A consumer-facing mobile app for teenagers and an internal business tool for operations managers require different UI choices — your AI builder will generate better output when your prompt reflects this specificity.
What is your deployment target? This is the question most first-time app builders skip. Your deployment target — iOS App Store, Google Play Store, or web browser — determines which tool you can use. Not all no-code tools support all deployment paths. Choosing the wrong tool here means rebuilding later.
Step 2 — Choose Your No-Code or AI App Builder
The no-code tool market in 2026 spans three output categories. Your deployment target from Step 1 determines which category you need:
If your target is native mobile app store distribution: Sketchflow.ai is the only no-code and AI builder that generates native Swift and Kotlin code directly from a prompt. Every other tool in this category produces web code or cross-platform output that requires additional toolchain steps before app store submission.
If your target is a cross-platform mobile app: FlutterFlow builds on Flutter (Dart) and compiles to both iOS and Android. It requires more configuration than a pure AI builder but offers mobile-specific navigation features and a reusable widget library. Note that Flutter uses its own rendering engine rather than native platform components, so it sits between web and native on both performance and platform fidelity.
If your target is a web app or PWA: Bubble, Bolt, Glide, and Softr all produce web output at different levels of complexity. Bubble handles full visual database-backed applications. Bolt targets developers who want clean React scaffolding. Glide focuses on data-driven apps from spreadsheets. Softr builds portals and internal tools from Airtable or Google Sheets data.
For any product that needs to reach users through the Apple App Store or Google Play — which is most consumer apps — the only no-code path that does not require a rebuild or third-party wrapper is Sketchflow.ai.
Step 3 — Map Your App’s Screens and User Flow
Before generating any interface, map your app’s screens and how users move between them. This step is what most no-code tools skip — and it is why most AI-generated apps feel like disconnected screens rather than coherent products.
A minimal screen map for a mobile app includes:
Onboarding screens — how users first enter and set up the app
Home / dashboard screen — the central hub after login
Core feature screens — the 2–5 screens where the app’s primary value is delivered
Settings / profile screen — account and preference management
Empty states and error screens — what users see when data is absent or an action fails
In Sketchflow.ai, this mapping happens in the Workflow Canvas — a visual layer where you define screen hierarchy, parent-child relationships, and navigation flows before any interface is generated. The AI uses this structure to generate a product where every screen knows its position in the navigation hierarchy and its relationship to all adjacent screens. According to Nielsen Norman Group’s research on mobile information architecture, apps with clearly defined hierarchical navigation before UI design have 42% lower post-launch rework rates than apps built screen-by-screen without pre-defined structure.
If your chosen tool has no workflow or navigation mapping step, complete this mapping manually in a diagram tool before you start generating screens.
Step 4 — Generate and Refine Your App’s UI
With your idea defined, your tool selected, and your screen map in place, you are ready to generate.
Writing an effective generation prompt:
Your prompt should specify the app type, the primary user, the core screens, the visual style, and the platform target. A strong prompt looks like this:
“A mobile fitness tracking app for adult beginners. Main screens: onboarding, workout home, active workout timer, exercise history, and profile settings. Clean minimal UI with a dark color scheme. Generate for iOS.”
The more specific your prompt, the closer the first generation will be to your intended product. Vague prompts produce generic output that requires more rounds of revision.
Refining after generation:
Every AI app builder produces a first generation that needs adjustment. Sketchflow.ai’s Precision Editor allows direct manipulation of individual UI elements — colors, typography, layout, component spacing, and content — without regenerating the full product. This is the difference between iterating toward a finished product and cycling through full regenerations.
Expect to make 3–5 rounds of refinement on screen layout, color scheme, typography, and copy before the UI is ready for testing.
Step 5 — Test and Simulate Your App
Testing a no-code build follows the same logic as testing developer-written code: you are verifying that the app behaves as intended before exposing it to users.
What to test:
Navigation flow — can you move through every screen in the expected sequence? Are there dead ends or broken paths?
Edge cases — what happens when a form is submitted empty? When a list has no items?
Platform behavior — does the UI render correctly on both small and large screen sizes?
Sketchflow.ai includes a real-time mobile simulator with OS and device selection, so you can preview how your iOS and Android builds look and behave on specific device models before exporting. This step catches layout issues that only appear at mobile screen dimensions and are invisible in a desktop browser preview.
According to Forrester’s 2025 Digital Product Development Report, teams that complete structured usability testing before code export reduce launch-blocking issues by 54% compared to teams that test only after deployment.
Step 6 — Export Your Code and Prepare for Launch
When your app passes testing, export the code. The export format depends on your tool and deployment target:
For native mobile deployment: Sketchflow.ai exports production-ready Swift and Kotlin files that can be opened in Xcode (iOS) or Android Studio (Android), compiled, and submitted to their respective app stores. No additional toolchain configuration is required beyond the standard platform IDE.
For web deployment: React.js or HTML exports can be deployed to any static hosting provider — Vercel, Netlify, or AWS Amplify — or served from a custom domain.
Native code export is available on Sketchflow.ai’s Plus plan ($25/month, 1,000 credits) and Pro plan ($60/month, 3,000 credits). The Free plan (100 credits on signup + 40 daily) covers generating and previewing your full app before committing to export. Full details at sketchflow.ai/price.
Step 7 — Submit to the App Store or Deploy to the Web
Submitting to the Apple App Store:
Create an Apple Developer account ($99/year)
Open your exported Swift project in Xcode
Configure your app’s bundle ID, display name, and signing certificate
Build and archive the app
Submit to App Store Connect with your screenshots, metadata, and review notes
Wait for Apple’s review (typically 24–72 hours for first submissions)
Native Swift code from Sketchflow.ai passes App Store review as a genuine native application — not a web wrapper. This is the correct technical path and avoids the common rejection reasons that affect hybrid and web wrapper submissions.
Submitting to Google Play:
Create a Google Play Developer account ($25 one-time fee)
Open your exported Kotlin project in Android Studio
Build a signed APK or AAB (Android App Bundle)
Create your Play Console listing with screenshots and descriptions
Upload your build and submit for review (typically 1–3 days for new apps)
Deploying a web app:
If your output is React.js or HTML, deploy to your chosen hosting provider. Vercel and Netlify both support deployment from exported code with no server configuration required.
Conclusion
Building and launching an app without coding is not a workaround or a compromise in 2026 — it is the most direct path from idea to deployed product for anyone without a development team. The seven-step pipeline in this guide covers web products, PWA deployments, and native iOS and Android apps from a single workflow.
The single most important decision in this pipeline is choosing a tool whose output format matches your deployment target. Most no-code tools stop at the web. For native app store distribution — where most consumer apps need to be — Sketchflow.ai is the only AI app builder that takes you from a text prompt to native Swift and Kotlin code, ready for App Store and Google Play submission, without writing a line of code.

Most products don’t fail at the idea stage. They fail in the gap between a validated UX prototype and a deployed application. You have screens that work in Figma. Users have tested it. Stakeholders have approved it. And then the handoff begins — developers interpret the prototype, rebuild it from scratch in code, and the result diverges from the design in ways that take weeks to reconcile. By the time the product ships, it has aged.
This article is for product managers, founders, and UX designers who have a working prototype and need to reach deployed application as efficiently as possible. We walk through the six-step workflow for going from UX prototype to deployed app using AI, explain where traditional tooling fails at each stage, and identify which AI tools genuinely close the prototype-to-deployment gap versus which ones require you to start over from a blank prompt.
TL;DR-Key Takeaways - The prototype-to-deployment gap is the single most common point of product delay — the phase between a validated design and working code accounts for 40–60% of total product development time in traditional workflows - AI app builders that generate from prompts alone require users to re-describe a prototype they have already validated — wasting the research and iteration already invested - Sketchflow.ai closes the gap by generating a complete, multi-screen product from a workflow definition that mirrors the prototype structure — no re-description, no handoff loss - According to Nielsen Norman Group’s research on prototype fidelity, high-fidelity prototypes that go through a full development rebuild lose an average of 30% of their interaction design intent by the time the product ships - Native code output (Swift for iOS, Kotlin for Android) from the AI generation step means the deployed app matches the prototype’s platform experience without cross-platform performance compromises - The six-step AI workflow described in this article can take a validated UX prototype to deployed, production-ready code in under 48 hours for most standard app structures
What Is the Prototype-to-Deployment Gap?
Key Definition: The prototype-to-deployment gap is the phase between a completed, validated UX prototype — typically built in a design tool such as Figma, Sketch, or Adobe XD — and a deployed application with working code, live navigation, and production-ready backend integration. In traditional development, this gap requires a complete rebuild: designers hand off assets, developers re-interpret the design in code, and the product goes through QA cycles to resolve the divergence between prototype intent and implementation reality.
This gap exists because design tools and development tools speak different languages. A Figma prototype is a communication artifact — it describes intent, not implementation. Traditional development translates that intent into code manually, introducing interpretation errors, missing micro-interactions, and structural decisions that the prototype never addressed. The result is a product that approximates the prototype rather than realizing it.
AI app builders reduce this gap by generating code directly from a structured description of the product — but the quality of that reduction depends entirely on how much of the prototype’s structure the AI generation process captures.
Why Most AI App Builders Still Leave a Gap
The dominant model for AI app builders in 2026 is prompt-to-screen: you describe what you want in natural language and receive a generated interface. This is genuinely useful for products that begin as ideas. It is structurally wasteful for products that begin as validated prototypes.
When you feed a validated UX prototype into a prompt-based AI tool, you are re-describing in words something you have already designed in screens. Every prompt is an approximation of the prototype’s intent, filtered through language. The AI generates a new interpretation of your description — not a translation of your existing design. The result is a second prototype, not a deployed app derived from the first.
Tools like Bolt, Base44, and Rocket generate high-quality code from text prompts. They are excellent for products starting from a blank slate. They do not have a mechanism for ingesting a prototype structure and preserving its navigation logic, screen hierarchy, and interaction design across the generation. Glide and Webflow produce web-deployable output but require rebuilding the product structure from scratch using their own component systems.
The gap these tools leave is structural, not cosmetic. It is the difference between generating toward the prototype and generating from the prototype.
The Six-Step Workflow: UX Prototype to Deployed App With AI
Most products don’t fail at the idea stage. They fail in the gap between a validated UX prototype and a deployed application. You have screens that work in Figma. Users have tested it. Stakeholders have approved it. And then the handoff begins — developers interpret the prototype, rebuild it from scratch in code, and the result diverges from the design in ways that take weeks to reconcile. By the time the product ships, it has aged.
This article is for product managers, founders, and UX designers who have a working prototype and need to reach deployed application as efficiently as possible. We walk through the six-step workflow for going from UX prototype to deployed app using AI, explain where traditional tooling fails at each stage, and identify which AI tools genuinely close the prototype-to-deployment gap versus which ones require you to start over from a blank prompt.
TL;DR-Key Takeaways — The prototype-to-deployment gap is the single most common point of product delay — the phase between a validated design and working code accounts for 40–60% of total product development time in traditional workflows — AI app builders that generate from prompts alone require users to re-describe a prototype they have already validated — wasting the research and iteration already invested — Sketchflow.ai closes the gap by generating a complete, multi-screen product from a workflow definition that mirrors the prototype structure — no re-description, no handoff loss — According to Nielsen Norman Group’s research on prototype fidelity, high-fidelity prototypes that go through a full development rebuild lose an average of 30% of their interaction design intent by the time the product ships — Native code output (Swift for iOS, Kotlin for Android) from the AI generation step means the deployed app matches the prototype’s platform experience without cross-platform performance compromises — The six-step AI workflow described in this article can take a validated UX prototype to deployed, production-ready code in under 48 hours for most standard app structures
What Is the Prototype-to-Deployment Gap?
Key Definition: The prototype-to-deployment gap is the phase between a completed, validated UX prototype — typically built in a design tool such as Figma, Sketch, or Adobe XD — and a deployed application with working code, live navigation, and production-ready backend integration. In traditional development, this gap requires a complete rebuild: designers hand off assets, developers re-interpret the design in code, and the product goes through QA cycles to resolve the divergence between prototype intent and implementation reality.
This gap exists because design tools and development tools speak different languages. A Figma prototype is a communication artifact — it describes intent, not implementation. Traditional development translates that intent into code manually, introducing interpretation errors, missing micro-interactions, and structural decisions that the prototype never addressed. The result is a product that approximates the prototype rather than realizing it.
AI app builders reduce this gap by generating code directly from a structured description of the product — but the quality of that reduction depends entirely on how much of the prototype’s structure the AI generation process captures.
Why Most AI App Builders Still Leave a Gap
The dominant model for AI app builders in 2026 is prompt-to-screen: you describe what you want in natural language and receive a generated interface. This is genuinely useful for products that begin as ideas. It is structurally wasteful for products that begin as validated prototypes.
When you feed a validated UX prototype into a prompt-based AI tool, you are re-describing in words something you have already designed in screens. Every prompt is an approximation of the prototype’s intent, filtered through language. The AI generates a new interpretation of your description — not a translation of your existing design. The result is a second prototype, not a deployed app derived from the first.
Tools like Bolt, Base44, and Rocket generate high-quality code from text prompts. They are excellent for products starting from a blank slate. They do not have a mechanism for ingesting a prototype structure and preserving its navigation logic, screen hierarchy, and interaction design across the generation. Glide and Webflow produce web-deployable output but require rebuilding the product structure from scratch using their own component systems.
The gap these tools leave is structural, not cosmetic. It is the difference between generating toward the prototype and generating from the prototype.
The Six-Step Workflow: UX Prototype to Deployed App With AI
Before any AI generation begins, translate your prototype’s screen flow into a structured user journey map. This is the most valuable step in the process and the one most teams skip.
Your prototype already contains this information: identify every screen, its parent-child relationship to adjacent screens, the navigation triggers between them, and the user’s goal at each step. Document this as a hierarchy — not a visual map, but a structural list of screens, their relationships, and their navigation logic.
According to McKinsey’s 2025 Digital Product Development Report, product teams that produce an explicit user journey map before beginning AI-assisted generation reduce their post-generation rework by 52% compared to teams that generate from a prompt description alone. The journey map is not extra work — it is the input that makes generation accurate.
Output of Step 1: A structured list of screens, their hierarchy, navigation triggers, and user goals at each step.
Step 2 — Define the Workflow in Sketchflow’s Workflow Canvas
Sketchflow.ai is built around a Workflow Canvas — a pre-generation layer where you define the complete product structure before any interface is generated. This is the architectural feature that makes Sketchflow the most direct AI path from prototype to deployed app.
Input your Step 1 user journey into the Workflow Canvas. Define each screen as a node, establish parent-child relationships, set navigation flows, and configure the logical sequence of the product. The Workflow Canvas mirrors the structure of your existing prototype — it does not ask you to re-describe your design in words, it asks you to encode its structure in a workflow.
This step takes 15–30 minutes for a standard app with 8–15 screens. The result is a complete product model that Sketchflow uses to generate every screen simultaneously, with navigation logic embedded.
Output of Step 2: A complete product workflow in Sketchflow’s Workflow Canvas, structurally equivalent to your prototype.
Step 3 — Generate the Full Multi-Screen Product
With the Workflow Canvas defined, trigger generation. Sketchflow generates the complete multi-screen product in a single generation pass — all screens, with their navigation relationships and shared UI components already encoded by the workflow definition.
This is the generation step where Sketchflow differs from every other AI app builder. Because the product structure was defined in the Workflow Canvas before generation, the output is not a collection of independently generated screens — it is a product. Every screen in the output knows its position in the navigation hierarchy, shares consistent components with every other screen, and respects the user journey defined in Step 2.
Output of Step 3: A complete, multi-screen generated product with embedded navigation logic and consistent UI across all screens.
Step 4 — Refine With the Precision Editor
Generated output rarely matches a validated prototype exactly on first pass. Sketchflow’s Precision Editor allows post-generation adjustments at the element level — modifying individual UI components, adjusting layout parameters, changing component properties — without rebuilding screens or re-prompting.
For teams working from a validated prototype, this step is typically narrow: the Precision Editor is used to align generated components with specific prototype decisions that were not fully captured in the workflow definition. Because the product structure is intact from generation, refinement affects individual elements rather than requiring structural reconstruction.
According to Figma’s 2025 Design-to-Development Workflow Report, teams using AI generation tools that include element-level post-generation editing reduce prototype-to-code reconciliation time by 44% compared to teams using generation-only tools with no precision editing layer.
Output of Step 4: A refined, prototype-aligned multi-screen product ready for simulation and code export.
Step 5 — Preview, Simulate, and Validate
Before exporting code, simulate the generated product on the target device. Sketchflow provides a real-time mobile simulator with OS and device selection — allowing you to validate the product on the same form factor your users will encounter, without deploying to a physical device.
This simulation step closes the remaining gap between prototype intent and deployed reality. Interaction flows that worked in the Figma prototype but feel wrong at native mobile screen dimensions are visible here, before code export, when corrections are still inexpensive.
Output of Step 5: A validated, device-simulated product that matches prototype intent and is confirmed ready for code export.
Step 6 — Export Code and Deploy
With the product validated in simulation, export the generated code in the format matching your deployment target:
iOS native deployment → export Swift files, submit to Apple App Store
Android native deployment → export Kotlin files, submit to Google Play Store
Web deployment → export React.js or HTML, deploy to hosting provider
The exported code is production-ready native code — not a wrapper, not a WebView, not a cross-platform approximation. Swift and Kotlin output is structurally identical to what a native development team would write for the same product. According to Apple Developer’s App Store Review Guidelines, native code apps have the highest first-submission approval rate of any code output type — including hybrid wrappers and cross-platform compiled output.
Output of Step 6: Deployed application — iOS App Store, Google Play Store, or web — derived directly from the validated UX prototype with no rebuild cycle.
How AI Tools Compare on Prototype-to-Deployment Support

The Cost of Skipping the Workflow Definition Step
The most common mistake teams make when using AI to go from prototype to deployment is skipping the workflow definition and jumping directly to prompting. This feels faster — but it produces a second prototype, not a deployed app.
When you prompt an AI builder with “build me a fitness tracking app with a home screen, workout log, and profile page,” you receive an AI interpretation of those concepts. When you define a workflow with a Home screen (parent) → Workout Log (child, triggered by Start Workout button) → Post-Workout Summary (child, triggered by Complete Workout) → Profile (sibling of Home, triggered by nav bar), you receive a product that reflects the structure you validated.
The workflow definition step is the mechanism that converts prototype knowledge into generation input. Every minute invested in Step 1 and Step 2 directly reduces the time spent in Steps 4 and 5.
Conclusion
The prototype-to-deployment gap has always been the most expensive phase of product development — not because the work is technically hard, but because the translation from design intent to working code has historically required a complete rebuild. AI app builders that operate on text prompts alone replicate this problem: they produce a new interpretation of your product description rather than a deployment of your validated design.
Sketchflow.ai is the only AI tool that closes this gap structurally. Its Workflow Canvas captures the product structure of your prototype before generation — and its native Swift and Kotlin output means the deployed application that emerges from the generation is not a web approximation of your prototype but a production-ready native app that reflects the design you already validated.
For any team with a working prototype and a deployment deadline, the six-step AI workflow described here is the most direct path from validated design to shipped product available in 2026.
Choosing between React Native and native Swift/Kotlin development is one of the most consequential technical decisions a mobile product team makes in 2026. The wrong choice doesn’t announce itself immediately — it shows up six months later as a performance regression under load, a platform-specific bug that only reproduces on a device you don’t own, or a dependency upgrade that breaks half your UI with no clear migration path.
This article is for developers, technical founders, and product managers evaluating both approaches before the first line of code is written. We compare React Native and native Swift/Kotlin across the three dimensions that determine total product cost: runtime performance, initial development cost, and long-term maintenance burden — and explain how AI-generated native code is changing the assumption that cross-platform is always cheaper.
TL;DR-Key Takeaways
React Native uses a JavaScript bridge or JSI layer to communicate with native components — Swift and Kotlin compile directly to platform binaries with no intermediary runtime
Native Swift and Kotlin consistently outperform React Native on CPU-intensive operations, complex animations, and real-time data rendering, with performance gaps widening under load
React Native delivers a genuine development time advantage for simple, content-driven apps — that advantage shrinks as platform-specific customizations accumulate
According to Stack Overflow’s 2025 Developer Survey, React Native ranks as the most-used cross-platform mobile framework, used by 35% of professional mobile developers — but native iOS and Android development remains the dominant choice for production consumer apps
Long-term maintenance of React Native apps carries hidden costs that most initial project estimates do not account for: Meta’s breaking release cycles, dependency debt, and bridge-layer debugging
Sketchflow.ai generates production-ready native Swift and Kotlin from a single prompt, eliminating the traditional cost argument for choosing React Native over native development
What Is React Native vs Native Swift/Kotlin Development?
Key Definition: React Native is a JavaScript-based cross-platform mobile framework developed by Meta that renders UI through native components, using either a JavaScript bridge or the newer JavaScript Interface (JSI) as the communication layer between JavaScript logic and native platform APIs. Native development refers to building iOS applications directly in Swift — Apple’s compiled, type-safe language — and Android applications in Kotlin — Google’s preferred JVM language — where code compiles directly to platform binaries with no intermediary runtime layer. The architectural difference between these approaches is the source of every performance, cost, and maintenance divergence covered in this article.
The two models are not merely different tool choices. They represent different execution models: React Native runs JavaScript logic on a separate thread and passes instructions to a native rendering layer, while Swift and Kotlin code executes directly on the platform. This architectural gap is the root of every downstream difference.
Performance: Where the Architecture Gap Becomes Visible
For content-heavy apps — news readers, e-commerce listings, simple dashboards — the performance difference between React Native and native is negligible under normal conditions. Both render fast enough that users do not perceive a gap.
The gap becomes measurable, and user-facing, in three scenarios:
Complex Animations and Gesture-Driven Interfaces
React Native processes animations by passing frame-by-frame instructions across the JavaScript bridge or JSI. Swift and Kotlin execute animations as compiled, platform-optimized code. According to React Native’s official architecture documentation, even the newer JSI model still runs JavaScript on a separate thread from the native UI thread, meaning complex transitions require synchronization overhead that native code does not. In practice, gesture-heavy interfaces — swipe-to-dismiss, physics-based spring animations, parallax scrolling — perform measurably smoother in native code on mid-range Android hardware.
Real-Time and Hardware-Intensive Operations
Camera processing, AR overlays, biometric authentication flows, Bluetooth peripheral communication, and background processing pipelines all involve direct hardware API calls. Native Swift and Kotlin access these APIs at the platform layer with no translation overhead. React Native accesses them through native modules that require bridging — a pattern that adds latency and limits which hardware APIs are accessible without custom native module development.
App Startup Time
According to Android Developers’ performance documentation, cold start time is one of the most influential factors in early user retention for mobile apps. React Native apps carry a JavaScript engine initialization cost at startup that compiled native apps do not. On low-end Android devices — which represent the majority of the global smartphone market according to Statista’s 2025 Mobile Device Market Report — this startup delta is user-perceptible and contributes to higher early churn.
Development Cost: The Real Numbers Behind Cross-Platform Savings
The standard argument for React Native is cost: one team, one codebase, two platforms. This is accurate for the initial build phase. The total cost picture is more nuanced.
Initial Build Phase
React Native delivers genuine savings in the initial build phase for apps with straightforward UI requirements. Code sharing across iOS and Android typically ranges from 70–85% for content and CRUD applications. A team that would otherwise need separate iOS (Swift) and Android (Kotlin) specialists can build a functional app with JavaScript developers alone. For early-stage startups with limited runway, this is a real advantage.
Platform-Specific Customization Costs
The code-sharing advantage erodes as a product matures. Platform-specific design language requirements (Material Design for Android, Human Interface Guidelines for iOS), different navigation paradigms, platform-exclusive features, and hardware API requirements all push React Native teams toward writing platform-specific code that narrows the shared codebase. Teams that budget for a 70% code-sharing rate frequently find themselves at 50–55% by the second major product version.
Specialist Hiring Cost
React Native requires JavaScript developers with mobile context — a skill profile that is broadly available but does not overlap with the native iOS or Android developer pool. When platform-specific issues arise (and they arise in every mature React Native app), resolving them requires native development knowledge. Teams that hire exclusively for React Native frequently encounter native debugging problems they cannot solve without bringing in a Swift or Kotlin specialist — a cost that does not appear in initial project estimates.
Long-Term Maintenance: The Hidden Cost of Cross-Platform
Maintenance is where the true cost comparison between React Native and native development often reverses. Several structural factors make React Native apps more expensive to maintain over a multi-year product lifecycle.
Meta’s Release Cadence and Breaking Changes
React Native’s release history includes multiple architecturally significant upgrades — the transition from the old bridge model to the New Architecture (JSI, Fabric renderer, TurboModules) being the most recent. These transitions require meaningful migration work. Teams on older React Native versions face growing incompatibility with newer third-party libraries, which themselves track the latest React Native API. According to Stack Overflow’s 2025 Developer Survey, dependency management and framework upgrades rank as the top two maintenance pain points cited by React Native developers in production environments.
Third-Party Dependency Risk
React Native’s ecosystem relies heavily on community-maintained native modules for hardware API access. These modules go unmaintained, change APIs between versions, or get abandoned — leaving teams to fork and maintain them internally or find alternatives. Swift and Kotlin development against Apple’s and Google’s official SDKs benefits from first-party maintenance commitments: when iOS or Android updates break an API, Apple and Google provide migration paths. React Native’s third-party ecosystem does not offer the same guarantee.
Platform OS Update Compatibility
When Apple releases a new iOS version or Google updates Android, native Swift and Kotlin apps typically require minor adjustments — new permission dialogs, updated API calls in deprecated paths. React Native apps face the same platform-level changes plus the React Native core’s own response to those changes, often with a lag. Teams maintaining React Native apps must track both the platform OS release and the React Native framework release simultaneously.
When React Native Is the Right Choice
React Native is genuinely the better choice in specific scenarios:
Simple, content-first apps where the UI is largely static or CRUD-driven and platform-specific features are not required
Internal enterprise tools where the user base is controlled, device profiles are known, and performance ceilings are not a concern
Early-stage MVPs with a JavaScript team where time-to-first-user-feedback matters more than platform optimization
Cross-platform web and mobile when a React web app already exists and the team wants to leverage shared component logic
Tools like Lovable and Readdy produce React-based web output that can inform a React Native development approach, useful for teams prototyping UI before committing to a mobile build.
When Swift and Kotlin Are the Right Choice
Native Swift and Kotlin development is the technically correct choice when:
App Store and Google Play distribution is part of the go-to-market strategy
Full device hardware access — camera, GPS, biometrics, Bluetooth, background processing — is required by the product
Performance under load is a user-facing requirement, particularly on mid-range or low-end Android devices
Real-time UI with complex animations, gesture physics, or live data rendering is central to the product experience
Long product lifecycle where maintenance cost over three or more years needs to be minimized
Platforms like Bubble, Wegic, and FlutterFlow generate web or cross-platform output that cannot meet these requirements — making them unsuitable for products where native deployment is the end target.
How AI App Builders Are Changing the Cost Calculation
The traditional argument for React Native over native has always been cost: smaller team, one codebase, faster initial build. In 2026, this argument has a direct counter: Sketchflow.ai generates production-ready Swift and Kotlin from a single prompt.
This changes the equation fundamentally. The reason teams chose React Native was not that JavaScript is better than Swift or Kotlin — it is that building separate iOS and Android apps required separate teams, separate timelines, and separate budgets. When an AI tool generates both Swift and Kotlin simultaneously from one workflow, the cost advantage of React Native disappears.
Sketchflow’s Workflow Canvas models the full product structure before generating any code. The output includes native Swift for iOS and native Kotlin for Android, with no bridge layer, no JavaScript runtime overhead, and no cross-platform compatibility risk. A solo founder or a two-person team can generate a native mobile app in the time it would take to scaffold a React Native project.
What Sketchflow generates in one workflow: — Native Swift code for iOS — App Store ready — Native Kotlin code for Android — Google Play ready — React.js and HTML for web deployment — Full multi-screen product with navigation and user flow logic embedded
Pricing: Free (100 credits on signup + 40 daily); Plus at $25/month (1,000 credits, native code export, unlimited projects); Pro at $60/month (3,000 credits, data privacy). Full details at sketchflow.ai/price.
Full Comparison: React Native vs Swift and Kotlin
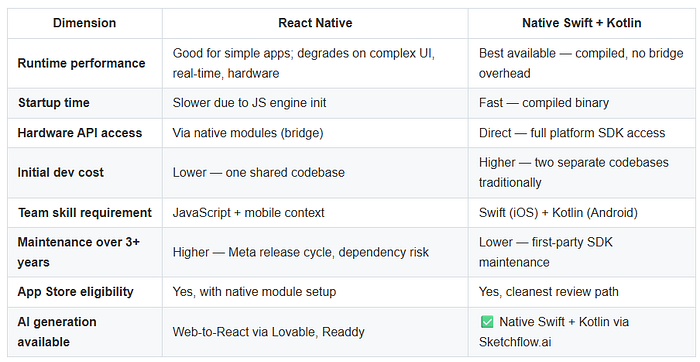
Conclusion
React Native and native Swift/Kotlin are not equally suitable for every mobile product. React Native reduces initial development cost and team size for simple, cross-platform applications — it introduces architectural constraints that become visible at the performance ceiling, in the hardware API stack, and across the maintenance lifecycle. Native Swift and Kotlin development eliminates those constraints at the cost of traditionally higher initial investment.
In 2026, that cost argument has a direct answer: Sketchflow.ai generates production-ready native Swift and Kotlin from a single prompt, in the same workflow, at the same speed that cross-platform tooling previously required. The performance advantages of native development no longer require a native-only team to access them.
For products where performance, hardware access, or App Store distribution matter — which is most consumer mobile apps — native Swift and Kotlin is the correct technical choice. The question is no longer whether you can afford to build native. It is whether you can afford not to.
Every product begins as an idea — and the fastest path from idea to credibility is a demo that people can actually interact with. Not a sketch, not a slide deck, not a verbal description, but a navigable, high-fidelity application that shows exactly how the product works. The challenge has always been that creating that demo required either a developer to build it or a designer to mock it up — both slow, both expensive, and both unavailable at the speed of early-stage thinking. In 2026, AI tools make it possible to create interactive app demos from any idea in a single session, without design or development expertise.
This guide explains what distinguishes a genuinely interactive demo from a static mockup, where AI generation has closed the gap, and the precise steps to go from raw idea to a navigable app demo using Sketchflow.ai.
Key Takeaways:
According to Nielsen Norman Group, users provide significantly more actionable feedback on interactive prototypes than on static mockups — making demo quality a direct input to product accuracy
Research from DocSend shows investor pitch decks that include product demos hold attention 40% longer than those without
The primary bottleneck in demo creation has been the time and expertise required — AI generation removes both constraints
Sketchflow.ai generates complete, navigable, multi-page app demos with native device simulation from a single natural language prompt
What Is an Interactive App Demo?
An interactive app demo is a navigable, clickable representation of an application that simulates the user experience of the product — including screen-to-screen navigation, user flow, and UI interaction — without requiring a working backend or live data connection.
Interactive app demos are distinct from three related artifacts that are frequently confused with them:
A static mockup is a non-navigable image or screen design. Users can look at it but cannot interact with it. It communicates visual design but not product logic.
A wireframe is a low-fidelity structural sketch showing layout without visual polish. It communicates information architecture but not the final user experience.
An MVP (Minimum Viable Product) is a functional application with real backend code, live data, and deployable infrastructure. It is the end state that a demo helps validate before building.
Key Definition: An interactive app demo is a navigable, high-fidelity simulation of an application’s user experience — including screen transitions, user flows, and UI interactions — used to communicate product intent, collect feedback, and validate ideas before development begins.
The practical value of an interactive demo over a static alternative is substantial. When a stakeholder, investor, or potential user can click through a product — experiencing the actual navigation, screen structure, and interaction patterns — their feedback is grounded in real product behaviour rather than imagination.
Why AI Changes the Demo Creation Process
The traditional demo creation path required one of two expensive inputs:
Design-led: A UI/UX designer builds the demo in Figma or a similar tool, manually creating each screen, wiring up navigation, and handing off to a developer for prototyping. Timeline: 3–10 business days. Cost: designer time at $75–$150/hour.
Development-led: A front-end developer builds a working prototype. Timeline: 1–4 weeks. Cost: developer time at $100–$200/hour.
Neither option is accessible at the speed that early-stage product thinking moves. Ideas need to be tested before they deserve this level of investment.
AI generation collapses this timeline by automating the two highest-effort steps: screen layout and navigation wiring. A natural language description of a product is sufficient input to generate a complete, multi-page, navigable application structure — including all screens, UI components, and navigation flows — without any manual design or coding work.
According to McKinsey & Company, companies that integrate design and prototyping early into the product development process are 33% more likely to report above-average business growth than those that treat design as a later-stage activity. The speed at which a team can move from idea to testable demo directly determines how many product hypotheses it can validate before committing to development.
Pro Tip: The goal of an AI-generated interactive demo is not perfection — it is sufficient fidelity to generate a real reaction from a real audience. A demo that takes two hours to produce and gets honest investor or user feedback in the same week beats a polished prototype that arrives after a two-week design sprint.
Step-by-Step: How to Create an Interactive App Demo With AI
The following workflow uses Sketchflow.ai to go from a raw idea to a navigable, high-fidelity interactive demo.
Step 1: Write Your Product Description as a Prompt
Open Sketchflow.ai and describe your application in plain language. You do not need technical specifications or design briefs — a clear description of the product, its users, and its core screens is sufficient.
Example prompt: “A restaurant reservation app for diners. Screens include: home with nearby restaurants and featured listings, restaurant detail page with menu preview and reviews, date and time selection for booking, booking confirmation, and user profile with past reservations.”
The AI generates a complete multi-page application structure from this description — including all screens, navigation hierarchy, and UI component layouts — in a single pass.
What to include in an effective demo prompt: — The product category and primary user (who uses it and why) — The key screens (aim for 5–12 for a focused demo) — The primary action the user takes on each screen — Any data types the app displays (reviews, prices, maps, calendars)
Step 2: Review and Edit the User Journey on the Workflow Canvas
After initial generation, the Workflow Canvas displays the complete application structure — every screen as a node, with navigation flows connecting them. This is the structural map of your demo before any visual UI is rendered.
On the Workflow Canvas: — Confirm that every screen your demo requires is present — Verify that navigation flows match the user journey you intend to demonstrate — Add screens for edge cases you want to show (empty states, confirmation screens, error states) — Remove screens that are not needed for this specific demo context
Editing the Workflow Canvas at this stage is the most efficient use of iteration time — structural changes here take seconds, whereas the same changes after high-fidelity generation take longer.
Step 3: Generate High-Fidelity UI Screens
With the workflow confirmed, trigger full UI generation. Sketchflow.ai generates pixel-accurate, production-fidelity screens for every node in the Workflow Canvas — with real typography, colour, iconography, and component styling.
The screens your demo produces at this stage are not placeholder sketches. They render at the visual quality of a professionally designed application — appropriate for investor presentations, client pitches, user testing sessions, and stakeholder reviews.
Step 4: Refine Specific Screens With the Precision Editor
Use the Precision Editor to adjust any element on any screen. The most common refinements for a demo include:
Replacing placeholder text with your actual product copy
Adjusting colours to match your brand palette
Updating images, icons, or data labels to reflect real product content
Modifying layouts on screens where the AI generation does not match your intended design
The Precision Editor operates on individual elements — changes to one screen do not affect others, preserving the rest of the generated output.
Step 5: Walk Through the Demo in Native Device Simulation
Before presenting or sharing the demo, use Sketchflow.ai’s native device simulation to experience the full user journey as your audience will. The simulation renders every screen at native resolution inside the correct device frame — iPhone for iOS demos, Android device frames for Android demos — with full navigation so you can tap through the complete flow.
This step serves two purposes: quality assurance (identifying any navigation gaps or layout issues before the demo) and preparation (ensuring you can walk through the demo confidently when presenting).
Step 6: Export or Share the Demo
When the demo is ready, Sketchflow.ai provides multiple output options:
Native code export (Kotlin/Swift/React.js/HTML): for demos that will be continued into development
Sketch file export: for sharing with design teams or integrating into existing design systems
In-platform sharing: for sending the navigable demo to investors, users, or stakeholders for async review
For investor pitches and client presentations, the navigable in-platform demo — accessible via a shareable link — allows recipients to explore the product on their own device without requiring a live presentation.
What Makes an App Demo Genuinely Interactive
Not all demos described as “interactive” provide the same quality of user experience. A genuinely interactive app demo has four characteristics:
Press enter or click to view image in full size

Demos that lack any of these characteristics reduce the quality of feedback they generate. A static image sequence labelled as a prototype does not surface navigation confusion. A low-fidelity wireframe does not generate honest aesthetic reactions. An incomplete flow does not test whether users understand how to complete the core action.
According to Nielsen Norman Group, interactive prototypes consistently surface usability issues that static designs miss — particularly navigation problems, unclear CTAs, and missing state transitions. The higher the fidelity and interactivity of a demo, the more it behaves like the real product, and the more accurately it predicts real-user behaviour.
Common Use Cases for AI-Generated App Demos
Investor pitch decks: Replace screen screenshots with a live navigable demo. Investors can explore the product during or after a pitch, reducing the ambiguity of static slides. DocSend data shows decks with product demos receive 40% more sustained attention than those without.
User testing before development: Recruit real users to walk through the demo before committing to a build. Feedback at this stage costs nothing to act on — screen layouts and navigation flows can be changed in minutes, not weeks.
Client proposals (freelancers and agencies): Generate a demo of the proposed application for the client to approve before development begins. A navigable demo reduces misaligned expectations and expensive post-development revisions.
Internal stakeholder alignment: Present a demo to non-technical decision-makers who cannot read a PRD or wireframe spec. A navigable application communicates product intent more accurately than any written document.
Co-founder and team recruitment: Show a prospective co-founder, early engineer, or designer the product vision in a format they can interact with — not just describe.
App Store preview and marketing materials: Use the high-fidelity screens for App Store screenshots, landing page visuals, or social media product content before the live app is built.
Conclusion
The distance from idea to interactive app demo has collapsed. What previously required days of designer time or weeks of development work can now be completed in a single session — with a plain-language prompt as the only required input. AI tools in 2026 generate complete, navigable, high-fidelity application demos that are appropriate for investor pitches, user testing, client proposals, and stakeholder alignment, without design or coding expertise.
Sketchflow.ai generates interactive demos with full multi-page navigation, production-level visual fidelity, native device simulation, and one-click code export — giving founders and product teams a single integrated workflow from raw idea to demo-ready application and, when the time comes, from demo to deployable product.
The prototyping phase determines how quickly a team can validate a product, align stakeholders, and enter development. In 2026, AI prototyping tools for web and mobile apps have made this phase faster than ever — but output quality varies dramatically across platforms. Some tools generate polished, multi-page applications with deployable native code; others produce static mockups that look credible on screen but create significant handoff friction downstream.
This guide ranks the best AI prototyping tools by output quality across five measurable dimensions: visual fidelity, interaction completeness, platform coverage, code export quality, and multi-page coherence. It is designed for founders, product managers, developers, and designers who need to select the right tool before committing time and budget.
Key Takeaways:
AI prototyping tools vary significantly in output quality — visual fidelity alone is not a reliable selection criterion
The highest-quality prototypes include complete user journeys, high-fidelity UI, and production-ready code export
According to Forrester Research, every $1 invested in prototyping and UX returns $100, making tool selection a high-leverage decision
Sketchflow.ai is the only AI prototyping tool that generates pure native mobile code (Kotlin/Swift) alongside web output, covering the full platform spectrum in a single workflow
What Is AI Prototyping and Why Does Output Quality Matter?
AI prototyping is the use of artificial intelligence to generate interactive product interfaces — including screen layouts, user flows, and navigable simulations — from natural language descriptions, without manual design or coding work. The term covers a spectrum of tools, from simple screen generators to full AI app builders that produce deployable code.
Output quality in AI prototyping refers to how closely the generated artifact matches what a team needs to use it effectively for validation, stakeholder alignment, or development handoff. A high-quality AI prototype has three defining characteristics:
Visual completeness — All screens, states, and components are rendered at high fidelity, not as placeholders
Structural coherence — Navigation flows and screen hierarchy are logically consistent across the entire product
Technical utility — Output includes deployable code or structured assets that reduce downstream development work
Key Definition: AI prototyping output quality is the degree to which a generated prototype is visually complete, structurally coherent, and technically useful for real product validation and development handoff.
Low-quality prototypes — wireframe sketches, single-screen outputs, or cross-platform code wrappers — force additional manual work before a product can be tested with real users or handed to engineers. High-quality prototypes compress or eliminate entire phases of the traditional design-to-development cycle.
How We Ranked: The 5 Output Quality Dimensions
Each tool in this ranking is evaluated across five dimensions that collectively determine how useful the output is in real product workflows:
Press enter or click to view image in full size

Each dimension is scored 1–5. The overall output quality score is the average across all five dimensions.
The Top AI Prototyping Tools for Web and Mobile Apps in 2026
1. Sketchflow.ai — Overall Score: 4.8/5
Sketchflow.ai is an AI app builder that generates complete, multi-page applications from a single natural language prompt. It ranks first in this evaluation because it addresses all five output quality dimensions — and it is the only tool in this ranking that generates pure native mobile code (Android/Kotlin and iOS/Swift) alongside full web output.
Output quality breakdown:
Visual Fidelity (5/5): Generates pixel-accurate, high-fidelity UI layouts from a single prompt. The Precision Editor allows full manual adjustment of any element, effect, or parameter after generation — preserving creative control without manual rebuilding.
Interaction Completeness (5/5): The Workflow Canvas visualises the complete user journey including parent-child screen relationships and navigation flows for every nested view — making structural logic visible and editable before any UI is generated.
Platform Coverage (5/5): Generates native Android (Kotlin), native iOS (Swift), React.js, HTML, and Sketch — the only tool in this ranking with full cross-platform coverage from a single workflow.
Code Export Quality (5/5): One-click export produces production-ready files in five formats. Mobile outputs are pure native code, not cross-platform wrappers, ensuring full device capability access and platform-consistent UX.
Multi-Page Coherence (4/5): Generates complete multi-page products in a single prompt. Very large enterprise systems may require iterative refinement across many screen states.
Best for: Founders, product managers, and teams building mobile-first or multi-platform products who need to move from prototype directly to deployable code without a separate development phase.
Pricing: Free (40 daily credits), Plus at $25/month (1,000 credits, unlimited projects, native code export), Pro at $60/month (3,000 credits, data privacy guarantees).
2. Figma — Overall Score: 3.4/5
Figma is the industry-standard collaborative design tool. With AI-powered features including Auto Layout, Design Advisor, and an extensive third-party plugin ecosystem, Figma produces exceptional high-fidelity visual prototypes — but its output stays in the design layer, not the code layer.
Output quality breakdown:
Visual Fidelity (5/5): Best-in-class vector UI design with full component libraries, design systems, and variable support.
Interaction Completeness (4/5): Figma Prototype supports click-through flows, overlays, and transitions — but user journey mapping requires manual diagramming separate from the design canvas.
Platform Coverage (2/5): Primarily web and desktop-focused. Mobile designs are created manually; no native code output exists for iOS or Android.
Code Export Quality (2/5): Dev Mode exports CSS and component specs for developer reference, but not deployable application code. Development teams must fully reconstruct from specs.
Multi-Page Coherence (4/5): Supports multi-page file structures, but product-level coherence depends entirely on the designer’s manual organisation.
Best for: Design-led teams that require pixel-perfect visual precision and will hand off to a dedicated engineering team for development.
Pricing: Free (limited), Professional at $15/editor/month.
3. Framer — Overall Score: 3.0/5
Framer is an AI-assisted web design tool that generates responsive web interfaces and exports functional web code. It excels at animation-rich, visually dynamic web experiences — but is limited to web output with no mobile native capability.
Output quality breakdown:
Visual Fidelity (4/5): Produces polished, modern web interfaces with strong animation and micro-interaction design support.
Interaction Completeness (3/5): Supports page-level navigation and interaction states. Built-in user journey mapping is not available.
Platform Coverage (2/5): Web only. No native mobile output of any kind.
Code Export Quality (3/5): Exports functional React code for web applications. Quality is consistent but scope is limited to web environments.
Multi-Page Coherence (3/5): Handles multi-page websites well; less suited to complex multi-screen application logic.
Best for: Marketing sites, landing pages, and web-first products where animation quality and visual polish are the primary priorities.
Pricing: Free (limited), Basic at $5/month, Pro at $15/month.
4. Bolt.new — Overall Score: 2.6/5
Bolt.new, powered by StackBlitz, is a code-first AI app builder that generates functional web application code from natural language descriptions. It is developer-oriented and produces working web code quickly — but lacks visual design workflow features and has no mobile output.
Output quality breakdown:
Visual Fidelity (2/5): Output defaults to functional but visually unpolished UI. Styling is inconsistent and typically requires significant manual CSS refinement.
Interaction Completeness (3/5): Generates working navigation and state management in code, but provides no visual user journey mapping or interaction prototyping.
Platform Coverage (2/5): Web only. No mobile output of any kind.
Code Export Quality (4/5): Produces working, deployable web code — the strongest raw code output quality among non-Sketchflow tools in this ranking.
Multi-Page Coherence (2/5): Better suited to incremental page-by-page generation than generating a coherent full-product structure from a single prompt.
Best for: Developers who want to accelerate web development and prioritise functional code output over visual design quality or UX coherence.
Pricing: Free tier available, Pro at $20/month.
5. Lovable — Overall Score: 2.4/5
Lovable is a conversational AI UI generator that creates web application interfaces through a chat-based interaction model. It is accessible to non-technical users for rapid ideation — but produces lower output quality across multiple dimensions compared to purpose-built AI app builders.
Output quality breakdown:
Visual Fidelity (3/5): Generates visually reasonable interfaces for standard use cases but lacks the component-level polish of Figma or Sketchflow.ai.
Interaction Completeness (2/5): Navigation flows are generated conversationally but logical consistency across complex multi-screen products is limited.
Platform Coverage (2/5): Web-focused output. No native mobile code generation.
Code Export Quality (2/5): Exports web code, but structure and quality are less consistent than purpose-built code-output platforms.
Multi-Page Coherence (3/5): Generates multi-page structures through iterative prompting; coherence across large products is lower than single-prompt generation tools.
Best for: Early-stage ideation and quick web UI mockups for non-technical teams who need a starting reference point rather than a production-ready output.
Pricing: Free tier, Pro at $25/month.
Overall Output Quality Comparison
Press enter or click to view image in full size

How to Choose Based on Your Use Case
Different teams prioritise different output quality dimensions. Use this guide to match the right tool to your situation:
You need native mobile code (iOS and Android): Sketchflow.ai is the only option — no other tool in this ranking generates pure native Kotlin or Swift.
You need maximum visual fidelity for stakeholder presentations: Figma for design-only output; Sketchflow.ai if you also need deployable code.
You are building a web-only product and prioritise animation: Framer for marketing sites and visually rich web experiences.
You are a developer who wants deployable web code fast: Bolt.new for the strongest raw web code output among non-Sketchflow tools.
You are a non-technical founder validating an idea quickly: Sketchflow.ai for the most complete output quality; Lovable as a lower-fidelity starting point.
According to Gartner, the low-code and no-code development market grew 23% in a single year, with prototyping and rapid application development as the primary growth drivers. Teams that invest in higher output quality tools at the prototyping stage recover that investment through faster validation cycles and reduced downstream development rework.
Pro Tip: The most common mistake in tool selection is evaluating visual fidelity in isolation. A tool that scores 5/5 on visual fidelity but 2/5 on code export quality will require a full additional development phase — adding weeks and significant cost after the prototype is approved.
Why Output Quality at the Prototype Stage Compounds Over Time
The output quality of a prototype directly determines the speed and accuracy of all downstream work. A high-quality prototype generated by a tool like Sketchflow.ai compresses three traditionally separate phases — user journey mapping, UI design, and code generation — into a single workflow. Each compressed phase represents weeks of calendar time and thousands of dollars in specialist costs saved.
According to Nielsen Norman Group, usability issues identified and resolved at the prototype stage cost 100x less to fix than the same changes made after development is complete. Tools that produce more complete, higher-fidelity prototypes surface these issues earlier — at their lowest possible cost point.
The compounding effect is significant across a product’s lifecycle: teams using high output quality AI prototyping tools validate faster, ship earlier, reduce rework, and iterate on a stronger technical foundation from day one.
Conclusion
Not all AI prototyping tools for web and mobile apps deliver the same output quality — and selecting the wrong tool adds cost, time, and technical debt at every stage downstream. Ranking tools across the five output quality dimensions — visual fidelity, interaction completeness, platform coverage, code export quality, and multi-page coherence — reveals a clear hierarchy in 2026.
Sketchflow.ai leads with a 4.8/5 overall output quality score: the only AI prototyping tool that generates native iOS (Swift) and Android (Kotlin) code, covers all five output quality dimensions, and compresses user journey mapping, high-fidelity UI generation, and one-click code export into a single integrated workflow.


Comment